The cost of a spinal cord stimulator can range anywhere from $30,000 to $80,000 in the United States, depending on the treatment phase, type of device, and insurance coverage. This procedure is often recommended for patients with chronic back, leg, or neuropathic pain who have not found relief from medication or surgery. While the device can provide long-term pain control, it also involves a multi-step process that includes consultation, a trial phase, permanent implantation, and ongoing follow-up visits.
Understanding how each stage contributes to the total spinal cord stimulator cost helps patients plan financially and make informed treatment decisions.
How the Spinal Cord Stimulator Works
A spinal cord stimulator (SCS) is a small, battery-powered device implanted under the skin. It delivers mild electrical impulses to the spinal cord to block pain signals before they reach the brain. Patients typically undergo a trial period first to determine whether the device provides sufficient pain relief before committing to a permanent implant.
The overall cost of treatment depends heavily on the type of device, number of leads implanted, and duration of follow-up care. Understanding each cost component will help you estimate expenses and communicate more effectively with your doctor and insurer.
Average Spinal Cord Stimulator Cost by Treatment Stage
Because this procedure involves several steps, each phase contributes differently to the total expense. Below is a detailed breakdown of what patients in the U.S. can typically expect.
1. Pre-Trial Consultation and Evaluation
Before moving forward with the trial, a pain management specialist must determine whether the patient is a good candidate.
This evaluation may include:
- Diagnostic imaging (MRI or CT scan)
- Psychological evaluation (required by many insurers)
- Physical assessment and medical history review
Depending on your location and provider, this phase typically costs $1,000 to $2,500. If you require additional testing, the cost may rise slightly. Most insurance plans cover this step if the patient meets medical necessity criteria for chronic pain.
Key takeaway: The initial consultation is necessary for diagnosis, device selection, and insurance authorization before the trial begins.
2. The Trial Procedure
The trial stage is a short-term test that allows the patient to experience spinal cord stimulation for about a week. Temporary leads are inserted into the epidural space and connected to an external generator worn on the belt or back.
This stage lets doctors assess how much pain relief the device provides before recommending permanent implantation. The cost of a spinal cord stimulator trial includes:
- Physician and surgical facility fees
- Imaging guidance during lead placement
- Device rental and programming
- Follow-up removal appointment
On average, the trial procedure costs between $7,000 and $10,000. Insurance typically covers the trial if conservative treatments (such as physical therapy, medication, or injections) have failed.
If the trial provides at least 50% pain relief, patients are often approved for permanent implantation.
3. Permanent Implantation Surgery
If the trial is successful, the next phase is permanent implantation, where the leads and battery-powered pulse generator are surgically implanted under the skin, usually in the abdomen, upper buttock, or chest area.
This step accounts for the largest portion of the overall spinal cord stimulator cost. The surgery usually involves:
- Anesthesia and operating room fees
- Permanent device and battery (rechargeable or non-rechargeable)
- Surgeon and assistant fees
- Hospital stay (same-day discharge or 1–2 nights if necessary)
- Initial device programming and adjustments
The average cost for implantation ranges from $35,000 to $70,000, depending on the device type and facility. Rechargeable models, which last longer, generally cost more upfront but require fewer replacements later.
Bold takeaway: The permanent implant procedure is the most expensive phase, driven mainly by the device cost and surgical fees.
4. Post-Surgery Follow-Up and Maintenance Costs
After implantation, ongoing care is required to ensure the device continues functioning properly. Patients typically return for programming adjustments and battery checks. Follow-up visits can range from every few weeks initially to every six months once the patient stabilizes.
Maintenance costs include:
- Office visits for reprogramming and pain assessment
- Battery replacement every 7–10 years (for non-rechargeable systems)
- Occasional imaging or troubleshooting for lead migration
Each follow-up visit can cost $150 to $300, while a full battery replacement surgery may cost $10,000 to $20,000, depending on the model and surgical complexity. Most insurance policies cover medically necessary maintenance and replacements.
Spinal Cord Stimulator Cost Breakdown
Below is a comparison table summarizing typical cost ranges per stage of the spinal cord stimulator process.
| Treatment Stage | What’s Included | Average Cost Range (U.S.) | Insurance Coverage |
| Pre-trial consultation | Medical evaluation, imaging, and psychological screening | $1,000 – $2,500 | Usually covered if medically necessary |
| Trial procedure | Temporary leads, outpatient surgery, and device rental | $7,000 – $10,000 | Often covered |
| Permanent implantation | Surgical device placement, anesthesia, and hospital fees | $35,000 – $70,000 | Usually covered with prior authorization |
| Post-surgery follow-up | Device programming, rechecks, and maintenance visits | $150 – $300 per visit | Typically covered |
| Battery replacement | New battery and minor surgery (every 7–10 years) | $10,000 – $20,000 | Usually covered |
Note: These are general estimates and can vary significantly depending on geographic region, facility type (hospital vs. outpatient center), surgeon experience, and device brand.
Factors That Affect Spinal Cord Stimulator Cost
While the above table provides a general range, individual patient costs can vary widely. Several factors influence how much a spinal cord stimulator procedure ultimately costs.
1. Type of Device
Modern spinal cord stimulators come in different configurations: traditional, high-frequency, and burst stimulation systems.
Rechargeable models cost more upfront (about $50,000–$70,000) but last longer, reducing future replacement expenses. Non-rechargeable devices are cheaper initially but may require replacement every few years, increasing long-term cost.
2. Geographic Location
Hospitals in urban centers or coastal regions tend to charge more than facilities in smaller towns. For example, implantation in Los Angeles may cost 20–30% more than in the Midwest due to higher facility and physician fees.
3. Surgeon and Facility Fees
Each medical center sets its own pricing for operating room use, anesthesia, and recovery care. Teaching hospitals and specialty pain clinics may charge differently. Comparing cost estimates from several qualified providers can help you identify the best value.
4. Insurance Coverage and Deductibles
Most insurers, including Medicare, cover spinal cord stimulators for chronic pain that has not responded to other therapies. However, coverage varies by policy. You may still be responsible for deductibles, co-pays, or out-of-network charges.
It’s important to verify:
- Whether your provider is in-network
- If prior authorization is required
- How much your out-of-pocket maximum is for the year
These details can significantly impact the final bill.
5. Post-Operative Complications or Revisions
Although uncommon, some patients require additional surgery to reposition leads or replace a malfunctioning battery. Each revision can add $5,000 to $15,000 depending on complexity and hospital stay length.
Key takeaway: Insurance and facility fees are the biggest cost variables, while rechargeable devices may save money over time despite higher upfront costs.
Is a Spinal Cord Stimulator Worth the Cost?
For many patients with chronic pain, a spinal cord stimulator can be life-changing. Studies published in the Journal of Pain Research (2020) found that up to 70% of patients reported meaningful long-term pain relief, allowing them to reduce medication use and return to normal activities.
While the upfront costs are significant, the device often leads to fewer doctor visits, less reliance on opioids, and better quality of life. Many pain specialists consider it a cost-effective option for patients who have exhausted other treatments.
When deciding, patients should weigh both short-term financial impact and long-term benefits such as reduced pain medication, increased mobility, and improved mental health.
Paying for a Spinal Cord Stimulator
Given the high price tag, planning how to pay for treatment can ease stress and prevent surprises later.
Insurance Coverage
Most private insurers, Medicare, and workers’ compensation programs cover spinal cord stimulators when specific criteria are met. Typically, coverage applies if:
- The patient has chronic pain lasting more than six months
- Conservative therapies have failed
- A successful trial period demonstrates significant pain relief
Be sure to confirm with your insurer before scheduling surgery.
Out-of-Pocket Costs
Patients without full coverage may face substantial expenses. Negotiating a self-pay package or asking for itemized billing can sometimes lower overall costs. Outpatient surgical centers often offer competitive rates compared to hospitals.
Financing and Assistance Options
If insurance doesn’t cover the full amount, patients can explore options such as:
- Hospital payment plans: Most hospitals allow monthly installment payments.
- Medical financing programs: Companies like CareCredit and LendingClub offer flexible repayment options for elective procedures.
- Manufacturer assistance: Some device makers provide cost support or rebate programs for qualifying patients.
- Health Savings Accounts (HSA) or Flexible Spending Accounts (FSA): These can offset medical costs using pre-tax dollars.
Tip: Request a detailed cost estimate before surgery, including device, hospital, and anesthesia fees, so you know exactly what to expect.
Potential Hidden Costs to Consider
Even with good insurance, patients may face smaller, often overlooked expenses related to spinal cord stimulation. These include:
- Transportation and lodging: For patients traveling long distances to pain clinics or surgical centers.
- Missed work days: Recovery can take one to two weeks for most patients.
- Physical therapy: Some patients require light rehab after implantation, costing $50–$150 per session.
- Device replacement over time: While modern devices are durable, even rechargeable systems have a lifespan of about ten years.
Planning for these smaller costs ensures you’re financially ready for the full treatment journey.
Financial Planning Tips Before Surgery
A spinal cord stimulator is a long-term investment in pain management. To manage expenses wisely:
- Verify coverage early: Contact your insurer for a pre-authorization letter and keep records of all communications.
- Ask about in-network providers: Choosing network surgeons and facilities can reduce costs significantly.
- Request bundled pricing: Some centers offer “all-inclusive” packages covering surgery, anesthesia, and device fees.
- Compare rechargeable vs. non-rechargeable systems: While rechargeable models cost more initially, they reduce future replacement expenses.
- Save for follow-ups: Set aside funds for check-ups, reprogramming, or replacements down the road.
Financial takeaway: Thorough preparation before surgery helps minimize unexpected bills and ensures smoother recovery.
Living With a Spinal Cord Stimulator
Life after implantation can bring dramatic pain relief and renewed independence. Most patients resume normal activities within a few weeks and enjoy a steady reduction in chronic pain symptoms. However, it’s important to maintain regular check-ups and follow your doctor’s advice to ensure the device continues to perform well.
Over time, adjustments may be needed as pain patterns change or the device’s battery ages. Many patients describe the experience as “regaining control over their lives” after years of pain medication or limited mobility.
While the spinal cord stimulator cost can be significant, the lasting benefits often outweigh the initial investment, especially when it means reduced pain, fewer medications, and improved overall quality of life.
If you’re considering the procedure, speak with your pain management specialist about financing options, realistic expectations, and long-term care. A well-planned approach ensures that you not only manage costs effectively but also gain the full benefit of this life-enhancing technology.
Peripheral nerve stimulation has become a powerful method for managing chronic pain that does not respond to traditional treatments. It delivers controlled electrical impulses to specific nerves, disrupting pain signals before they reach the brain and spinal cord.
This approach allows physicians to target precise pain sources with minimal invasiveness, offering relief without dependence on opioids or repeated surgery. Many patients benefit from the therapy’s flexibility, adjusting stimulation levels to match daily needs and comfort.
Because it works directly on affected nerves, peripheral nerve stimulation provides a balance between control, effectiveness, and patient autonomy. It continues to gain popularity as an adaptable, reversible option for long-term pain relief.
What is Peripheral Nerve Stimulation?
Peripheral nerve stimulation, commonly abbreviated as PNS, uses small implanted electrodes to manage pain originating from specific nerves. These electrodes transmit gentle impulses that alter the way pain messages are processed within the nervous system.
The therapy functions as a bridge between conservative care and invasive procedures, helping patients regain movement and confidence. Its minimally invasive nature makes it suitable for individuals seeking targeted, low-risk pain control.
- How the Technology Works
The stimulator sends continuous, low-voltage currents that modify how nerves communicate with the brain. Instead of pain, the brain perceives a mild tingling sensation known as paresthesia, signaling successful modulation.
These impulses interfere with abnormal nerve activity, reducing the hyperexcitability that often accompanies chronic pain conditions. Over time, consistent stimulation can retrain neural pathways, diminishing the brain’s response to discomfort.
Because the therapy acts locally, patients experience relief without sedation or systemic side effects. Many can return to regular routines within days, with improved comfort and restored functionality.
- Conditions Commonly Treated
Peripheral nerve stimulation treats conditions where damaged or irritated nerves continuously send pain signals. These include complex regional pain syndrome, post-surgical pain, and nerve injuries in the limbs or back.
It also benefits patients with neuropathic pain that resists medication, offering long-term relief when other therapies fail. The approach can reduce the need for systemic drugs and improve mobility in everyday life.
Its success rate depends on nerve location, correct electrode placement, and patient response to trial stimulation. When managed correctly, many patients achieve sustained pain reduction and greater physical freedom.
| Condition | Common Target Nerve | PNS Type | Typical Relief |
| Post-Surgical Pain | Femoral or Sciatic | Temporary | 50–70% |
| Shoulder Pain | Suprascapular | Permanent | 60–80% |
| Neuropathic Pain | Peripheral Branches | Either | 50–75% |
| Complex Regional Pain Syndrome | Regional Network | Permanent | 60–85% |
Types of Peripheral Nerve Stimulators
Peripheral nerve stimulators can be broadly categorized into temporary and permanent systems, each designed to meet specific therapeutic needs. Temporary systems are primarily used for trial periods to assess a patient’s responsiveness before committing to long-term implantation.
Permanent stimulators include fully implantable devices that provide continuous neuromodulation and can last for several years with proper maintenance.
- Temporary or Trial Systems
Temporary stimulators allow clinicians and patients to test the effectiveness of peripheral nerve stimulation before permanent implantation. They typically use percutaneous leads connected to an external pulse generator worn on the body, offering flexibility in intensity adjustment and duration of therapy.
Patients may wear these systems for several days to weeks while recording pain levels, functional improvement, and comfort during daily activities. This trial phase helps identify optimal lead placement and confirms that stimulation produces meaningful relief.
Trial systems are minimally invasive and reversible, providing low-risk evaluation without long-term commitment. Successful trials are a strong predictor of permanent implant effectiveness and patient satisfaction.
- Permanent Implantable Systems
Permanent systems consist of a pulse generator surgically placed under the skin, often in the torso or near the joint closest to the affected nerve. The implanted leads remain in precise positions adjacent to the target nerve, delivering continuous electrical impulses according to programmed parameters.
These devices may be rechargeable or battery-powered, allowing long-term management without frequent replacements. Patients use an external controller to adjust stimulation intensity and patterns within physician-defined limits, optimizing pain relief throughout the day.
Permanent systems are recommended for patients with chronic or persistent pain conditions who respond well to trial stimulation. Long-term outcomes show consistent reductions in pain, improved mobility, and decreased reliance on systemic medications.
- Open vs. Closed-Loop Stimulation
Some modern stimulators incorporate closed-loop technology, which automatically adjusts stimulation in response to real-time nerve signals. Open-loop systems provide continuous fixed pulses, requiring manual adjustment for intensity and duration.
Closed-loop devices can enhance precision by maintaining therapeutic thresholds without over-stimulation or discomfort. Open-loop systems are simpler, often more cost-effective, and suitable for patients with stable, predictable pain patterns.
Closed-loop stimulators are particularly useful in cases where pain fluctuates due to activity, posture, or environmental factors. This adaptive functionality improves comfort and reduces the likelihood of diminished efficacy over time.
Procedure and Implantation Process
The procedure for peripheral nerve stimulation involves two main stages, starting with a trial period followed by permanent placement. This structure ensures that the treatment provides measurable relief before long-term implantation.
During both phases, imaging guidance helps position leads precisely near the target nerve. The process minimizes tissue disruption and preserves natural nerve pathways.
- Trial Stage and Evaluation
In the trial phase, thin wires are inserted under local anesthesia and connected to an external stimulator. Patients test various settings for several days while tracking pain reduction and activity improvement.
If the trial demonstrates significant pain relief, physicians proceed to the permanent implantation phase. This step confirms both effectiveness and patient comfort with daily device management.
Trial success rates are high when candidates are properly screened and instructed on how to monitor their experience. It ensures that the permanent system is only implanted in individuals most likely to benefit.
- Permanent Implantation
Permanent implantation occurs through small incisions near the initial lead placement site. A compact pulse generator is positioned beneath the skin, often near the hip or shoulder for easy access.
The leads remain attached to the nerve, transmitting stimulation from the internal power source. Physicians program the device using a wireless controller to fine-tune signal intensity and frequency.
Recovery usually takes less than two weeks, with most patients resuming moderate activity shortly after. Postoperative follow-up focuses on adjusting parameters and monitoring healing progress.
- Postoperative Care and Optimization
After surgery, mild swelling or soreness may occur but typically subsides quickly. Patients receive detailed instructions on hygiene, device operation, and when to report irregular sensations.
Routine follow-ups allow physicians to optimize therapy settings for maximum comfort and battery efficiency. Adjustments may continue for several months until the optimal stimulation pattern is found.
Proper adherence to care plans helps maintain stable results and reduces complications such as lead migration or skin irritation. Ongoing communication ensures consistent pain control and long-term success.
Benefits and Limitations
Peripheral nerve stimulation offers a combination of precise targeting, reversibility, and minimal systemic impact. It can reduce reliance on opioids, improve quality of life, and enhance patient autonomy in pain management.
Nevertheless, its effectiveness varies, and not all individuals achieve complete relief. Understanding benefits and limitations helps set realistic expectations and ensures informed decisions.
- Key Advantages
Because it targets only the affected nerves, PNS limits interference with other body systems. Patients maintain alertness and mobility without the drowsiness or gastrointestinal issues common with medications.
The stimulation can be adjusted instantly to match pain intensity or activity level. This adaptability gives patients direct control, allowing therapy to remain effective throughout daily fluctuations.
Long-term studies show substantial improvement in sleep, mood, and physical function among consistent users. These gains often persist as the nervous system stabilizes and learns to interpret pain differently.
- Risks and Limitations
Minor complications include infection, lead displacement, or device malfunction, though most are correctable. Some individuals may experience limited benefit if nerve targeting is inaccurate or tissue response varies.
Battery life and maintenance represent ongoing considerations, especially in high-frequency use cases. Rechargeable systems minimize these concerns but still require consistent attention.
For patients with complex pain profiles, PNS may work best as part of a broader care strategy. Combining therapy with physical rehabilitation and counseling often enhances total outcomes.
- Patient Selection and Screening
Ideal candidates are those with clearly defined nerve-related pain unresponsive to conventional treatment. Diagnostic testing confirms nerve function and ensures that stimulation will reach the appropriate area.
Patients with active infections, bleeding disorders, or unstable psychological conditions are typically postponed until stabilized. Careful evaluation prevents unnecessary risk and improves satisfaction.
Trial stimulation remains the most reliable predictor of long-term success. Individuals who achieve at least 50 percent pain reduction during testing usually maintain benefit after full implantation.
| Selection Criteria | Assessment Method | Impact on Success |
| Pain Localization | Imaging and Mapping | High |
| Psychological Readiness | Behavioral Screening | Moderate |
| Trial Response | Pain Score Tracking | Critical |
| Medical Stability | Full Examination | High |
Living with a Peripheral Nerve Stimulator
Living with a peripheral nerve stimulator requires minor adjustments that quickly become routine. Once healing is complete, most individuals manage the device confidently and integrate it into daily life.
These systems are designed to be durable, intuitive, and easy to maintain. Regular monitoring ensures safety while allowing patients to remain active and independent.
- Device Maintenance
Implanted pulse generators require occasional charging, often every few days depending on settings. Recharging involves placing a wireless pad over the implant site for short sessions.
Battery performance remains stable for several years before replacement is needed. Routine maintenance visits confirm that leads are secure and stimulation parameters remain optimal.
Most manufacturers design their devices to withstand moisture and moderate physical activity. Physicians provide specific guidance for exposure limits and safety precautions.
- Daily Activities and Lifestyle
Patients can resume normal exercise, work, and recreation soon after recovery. Low-impact activity helps maintain flexibility and supports muscular balance near the affected area.
High-contact sports or environments with strong electromagnetic fields should be avoided. Care teams supply tailored recommendations for balancing safety and mobility.
Integrating stimulation control into daily routines becomes instinctive over time. Many patients find it enhances confidence by providing predictable, on-demand pain relief.
- Long-Term
Long-term studies demonstrate that consistent users maintain significant improvement in pain levels and quality of life. The therapy’s adaptability makes it suitable for both temporary and chronic pain conditions.
Physicians encourage periodic recalibration to match changing nerve responses and lifestyle needs. This ongoing partnership between patient and provider ensures sustainable comfort.
Support programs offered by clinics often include mental health and physical therapy components. Together, they strengthen outcomes and reduce the emotional impact of chronic pain.
How to Stop Anxiety Nerve Pain
Peripheral nerve stimulation highlights how modern medical technology can transform chronic nerve discomfort into manageable sensation. It empowers patients through precision, consistency, and the freedom to control their own pain response.
Anxiety-related nerve pain follows a different but equally complex pathway, where stress amplifies physical sensitivity through heightened nerve activity. Reducing this tension through relaxation techniques, balanced sleep, and guided therapy can help break the pain–anxiety cycle.
Mind-body regulation supports the same neural balance achieved through stimulation therapy, creating lasting relief. When combined with professional guidance and daily mindfulness, these strategies restore calm and physical ease over time.
To talk about a chronic illness at work, focus on being clear, factual, and centered on how your condition affects your responsibilities rather than on medical details. Approaching the conversation with a calm, solution-oriented tone such as briefly explaining your needs and offering practical adjustments helps keep the discussion professional, respectful, and centered on your ability to perform your role.
This article also looks at how to talk about a chronic illness at work incluiding the key factors behind disclosure, including understanding your reasons for sharing, knowing your rights, and communicating effectively with managers or HR. It also covers handling uncomfortable questions, and recognizing when not to disclose in order to protect your privacy and well-being.
Understanding Your Reasons for Disclosing

Understanding your reasons for disclosing your chronic illness at work is an important first step in deciding how to communicate and what information to share. Being clear about your motivation helps you stay focused, set boundaries, and approach the conversation with confidence.
1. You need workplace accommodations
If your condition affects your work schedule, energy levels, or physical comfort, disclosing allows you to request reasonable adjustments. Sharing this information helps ensure that your environment supports your ability to perform well and manage symptoms effectively.
2. You may require flexibility for medical appointments
If you regularly see specialists or need ongoing treatments, letting your employer know can prevent misunderstandings about your availability. It also helps establish predictable routines for scheduling time off without unnecessary stress.
3. Your symptoms may occasionally affect performance
When flare-ups or fatigue impact your work, disclosure can provide context rather than leaving performance issues unexplained. This can help maintain trust with your manager and prevent assumptions about your commitment.
4. You want to prevent misunderstandings or concerns
Sometimes disclosure helps avoid confusion if your behavior, energy, or attendance fluctuates. A brief explanation allows others to understand your situation without needing detailed medical information.
5. You want to build transparency in your working relationships
If you value openness with your manager or team, sharing your condition may help you feel more supported. Transparency can strengthen communication, especially in long-term work environments.
6. You do not need accommodations and prefer privacy
Choosing not to disclose is completely valid if your condition doesn’t affect your job. Keeping medical information private protects your personal boundaries and allows you to maintain separation between work and health.
In the end, your reason for disclosing or not disclosing should align with what makes you feel protected, respected, and able to succeed at work. The more intentional you are about your motivations, the easier it becomes to communicate your needs clearly and confidently.
Know Your Rights and Workplace Protections
Knowing your rights and workplace protections helps you approach disclosure with confidence and ensures you receive fair treatment. Understanding what your employer can and cannot ask, as well as what support you’re entitled to, empowers you to advocate for yourself without fear.
1. Disability and medical privacy laws
These laws protect you from discrimination and ensure your employer cannot require detailed medical information. You are only obligated to share what is necessary to justify accommodations.
2. Reasonable accommodations
You have the right to request adjustments that help you perform your job, such as flexible schedules or modified workspaces. Employers are required to explore workable solutions unless they pose undue hardship.
3. Sick leave and medical leave policies
Most workplaces have guidelines allowing time off for health needs without penalty. Knowing these policies helps you plan appointments or recovery time responsibly.
4. Confidentiality from HR and management
Any medical information you provide must be kept private and only shared with those directly involved in processing accommodations. This ensures your personal health details are handled respectfully and discreetly.
By understanding your rights and protections, you can navigate workplace conversations with clarity and assurance. This knowledge creates a strong foundation for advocating for your needs while maintaining your privacy and dignity.
How to Talk About a Chronic Illness at Work

Talking about a chronic illness at work can feel intimidating, but approaching the conversation thoughtfully helps you maintain professionalism, privacy, and productivity. Focusing on how your condition affects your work rather than on medical details allows you to communicate effectively while advocating for the support you need.
1. Start with clarity
Be direct and concise about your situation, highlighting only what’s relevant to your role. A clear, professional explanation sets the tone and helps avoid confusion or assumptions.
2. Focus on impact, not symptoms
You don’t need to share detailed medical information; instead, explain how your condition may influence your work, like energy levels or scheduling. This keeps the conversation solution-focused rather than personal.
3. Suggest practical solutions
Propose specific accommodations, such as flexible hours, remote work, or modified tasks. Offering concrete solutions demonstrates responsibility and makes it easier for managers to respond positively.
4. Set professional boundaries
Decide what personal details you are comfortable sharing and communicate them respectfully. Establishing boundaries prevents over-sharing and protects your privacy while keeping discussions professional.
5. Reassure your commitment
Clarify that your goal is to continue performing your duties effectively despite your condition. Reassurance helps reduce concerns about reliability or productivity.
6. Choose the right time and setting
Schedule the conversation at a calm, private time when your manager can give you full attention. A thoughtful setting increases the likelihood of a supportive and constructive discussion.
7. Be prepared for questions
Anticipate common questions and plan neutral, professional responses. Being prepared reduces stress and helps maintain control over the conversation.
8. Follow up in writing if needed
After a discussion, a brief email summarizing any agreed-upon accommodations or adjustments can serve as a reference. This ensures clarity and avoids misunderstandings later.
9. Stay flexible and open
Be willing to revisit the conversation if your needs change or adjustments aren’t working. Flexibility shows cooperation while ensuring your health needs are met.
By combining clarity, preparation, and professionalism, you can navigate conversations about a chronic illness with confidence. Focusing on solutions, impact, and boundaries allows you to protect your privacy while securing the support you need to succeed at work.
Handling Uncomfortable Questions
Handling uncomfortable questions about your chronic illness at work is an important skill for maintaining boundaries and professionalism. Preparing responses in advance can help you stay calm, protect your privacy, and keep the conversation focused on work-related matters.
1. Redirect the focus to work
Politely steer the conversation back to tasks or accommodations. For example, you can say, “I’d prefer to focus on how I can manage my workload effectively.”
2. Keep answers brief and neutral
Provide only the information necessary to explain your needs. Short, factual responses prevent oversharing or inviting follow-up questions.
3. Set boundaries clearly
It’s okay to state that certain details are private. A phrase like, “I’m keeping my medical details confidential, but I’ll update you if anything affects work,” sets limits respectfully.
4. Use consistent responses
Responding consistently helps coworkers and managers understand your boundaries. This prevents repeated probing and maintains professional clarity.
5. Practice polite deflection
If a question feels intrusive, deflect politely without hostility. For example, “I’m managing it with my doctor, and it isn’t affecting my current responsibilities.”
By preparing responses and setting clear boundaries, you can handle uncomfortable questions with confidence. Staying professional and consistent ensures your privacy is respected while keeping the focus on your work.
Working With Managers or HR: Best Practices
Working with managers or HR when disclosing a chronic illness requires clear communication, professionalism, and collaboration. Following best practices ensures your needs are understood and addressed while maintaining positive workplace relationships.
- Be honest about limitations: Briefly explain how your condition may affect work without oversharing. This helps managers provide proper support.
- Provide advance notice of absences: Notify your manager ahead of appointments or flare-ups to allow planning and avoid disruption.
- Suggest solutions or accommodations: Propose practical adjustments, like flexible hours or remote work, to show initiative and facilitate cooperation.
- Maintain documentation if needed: Keep records of medical notes or accommodation requests for clarity and protection.
- Communicate regularly: Check in periodically to ensure accommodations are effective and adjustments are working.
- Know escalation options: If support is lacking or bias occurs, involve HR or employee resource groups to address issues professionally.
By following these practices, you can build a cooperative and supportive relationship with managers and HR. Clear, honest communication combined with practical solutions helps protect your health while maintaining professional credibility.
When Not to Disclose: Protecting Your Privacy
Deciding not to disclose a chronic illness at work is a valid choice that helps protect your privacy and maintain professional boundaries. Knowing when and why to withhold information allows you to focus on your work without unnecessary scrutiny.
1. When your condition doesn’t affect your job
If your illness doesn’t impact performance or require accommodations, disclosure may be unnecessary. Keeping it private helps maintain a separation between personal and professional life.
2. When workplace culture feels unsafe
In environments where stigma or bias exists, sharing your condition could negatively affect opportunities or relationships. Prioritizing safety and comfort is important.
3. When you prefer to maintain privacy
You are under no obligation to share personal medical details. Choosing privacy ensures your health information remains confidential.
4. When accommodations aren’t needed
If your work can be performed without adjustments, disclosure might not provide any benefit. This allows you to manage your condition independently.
5. When disclosure could trigger unwanted attention
Sharing may invite questions or assumptions from colleagues. Protecting yourself from intrusive discussions helps maintain focus and boundaries.
Ultimately, choosing not to disclose is about safeguarding your privacy and well-being. Assess your work environment, personal comfort, and professional needs to make the decision that best supports you.
Final Thoughts
Managing a chronic illness at work involves clear communication, focusing on how your condition affects your work, and proposing practical solutions. Keeping discussions professional and centered on responsibilities helps maintain boundaries and clarity.
It’s also important to know your rights, handle difficult questions, and decide when disclosure is necessary. Being informed and prepared ensures you can navigate the workplace effectively while maintaining privacy and professionalism.
Neuropathy in the feet develops when nerves responsible for sensation, balance, and muscle control become damaged or inflamed. This condition affects millions of Americans, especially adults managing diabetes, circulation problems, or long-term medication use. The first signs are often subtle tingling toes, burning soles, or occasional numbness but over time, those small sensations can turn into daily discomfort or loss of mobility.
The good news is that many causes of neuropathy can be prevented or controlled through healthy habits, early diagnosis, and attentive foot care. What triggers neuropathy in feet and how to prevent It? Understanding what triggers neuropathy in feet is the first step toward protecting nerve health and maintaining long-term comfort.

Understanding Neuropathy in the Feet
Neuropathy, or peripheral neuropathy, occurs when peripheral nerves, the ones outside the brain and spinal cord are damaged. In the feet, these nerves carry messages to and from the brain that control sensation, balance, and movement. When they are disrupted, the feet may feel numb, painful, or weak, even when there’s no visible injury.
Common symptoms include tingling, sharp or burning pain, muscle weakness, or a sensation of “walking on pins and needles.” Because nerves in the legs and feet are the longest in the body, they are often the first to show signs of dysfunction.
Peripheral neuropathy affects the nerves that send messages between the feet and the brain, making early detection key to prevention. Recognizing small changes in temperature sensitivity, balance, or skin color can help you act before nerve damage becomes permanent.
What Triggers Neuropathy in Feet?
The causes of neuropathy are wide-ranging, but most stem from poor blood flow, metabolic changes, toxins, or chronic diseases. Some triggers develop slowly over time, while others appear after injury or medication use.
Here are the main factors that commonly trigger foot neuropathy and how they affect the body.
Diabetes and Blood Sugar Damage
High blood sugar is the most common cause of foot neuropathy. Over time, elevated glucose damages tiny blood vessels that feed nerves, starving them of oxygen and nutrients. This process, known as diabetic neuropathy, affects about half of all people with diabetes according to the Centers for Disease Control and Prevention (CDC, 2023).
Uncontrolled diabetes can lead to numbness, burning pain, or foot ulcers that heal slowly. The longer blood sugar remains unstable, the higher the risk of irreversible nerve damage. Maintaining blood glucose within target ranges is therefore one of the strongest forms of prevention.

Lifestyle and Circulation Factors
Poor circulation limits oxygen delivery to nerves. Smoking, high cholesterol, or lack of physical activity can narrow blood vessels, slowing nutrient flow to the lower limbs. This increases the likelihood of tingling or cold sensations in the feet.
Obesity and prolonged sitting also affect blood flow. Staying active and maintaining a healthy weight helps ensure your nerves receive the oxygen and nutrients they need to function properly.
Injury, Alcohol, and Toxin Exposure
Physical injuries such as fractures, sprains, or repetitive strain can compress or damage nerves around the ankles or legs. Heavy alcohol consumption, on the other hand, interferes with vitamin absorption particularly B1, B6, and B12 which are critical for nerve repair.

Exposure to industrial toxins like heavy metals, pesticides, or certain cleaning solvents can also lead to neuropathy. Workers in chemical or manufacturing environments are especially vulnerable if protective gear is not used consistently.
Medication and Nutrient Deficiency Links
Certain prescription drugs may trigger neuropathy as a side effect. Chemotherapy agents, some antibiotics, and medications used to treat HIV or heart conditions can cause nerve irritation or degeneration over time.

Deficiencies in essential nutrients such as vitamin B12, folate, and vitamin E are equally harmful. These vitamins support nerve insulation (myelin sheath), and their absence weakens electrical signals between the brain and feet. People following strict vegan diets or with gastrointestinal conditions that affect absorption should monitor nutrient levels regularly.
Early Warning Signs You Shouldn’t Ignore
Foot neuropathy often begins with subtle sensations that can be mistaken for fatigue or circulation issues. Ignoring these early signs can lead to permanent nerve damage or foot ulcers that become difficult to treat.
Here are common red flags to watch for:
- Tingling or Burning Sensations – Persistent “pins and needles” in the feet, especially at night.
- Numbness or Reduced Sensation – Inability to feel temperature changes or touch on certain areas of the foot.
- Sharp or Shooting Pain – Sudden electric-like jolts that worsen when walking or resting.
- Muscle Weakness or Instability – Trouble standing on your toes or feeling unsteady when walking.
- Wounds That Heal Slowly – Small cuts or blisters that go unnoticed can become infected due to poor sensation.
Recognizing these symptoms early allows doctors to test nerve function and address underlying causes such as diabetes, poor circulation, or vitamin deficiency. Prompt attention can prevent the progression from mild nerve irritation to chronic neuropathy.
Prevention and Lifestyle Protection
Preventing neuropathy focuses on protecting the nerves’ oxygen supply, improving circulation, and supporting the body with the nutrients it needs to regenerate tissue. Even if neuropathy has already begun, healthy habits can slow its progression and ease discomfort.
Nutrition and Vitamins for Nerve Health
A balanced diet rich in antioxidants, whole grains, lean proteins, and healthy fats supports nerve repair. Specific nutrients play an especially important role:
- Vitamin B12: Found in fish, eggs, dairy, and fortified cereals; essential for nerve insulation.
- Vitamin B6 and Folate: Support neurotransmitter function and protect the myelin sheath.
- Alpha-lipoic acid and Omega-3s: Powerful antioxidants that reduce inflammation and support nerve healing.
- Magnesium: Improves circulation and muscle relaxation, reducing cramping or stiffness in the feet.
Limiting sugar, processed fats, and alcohol can significantly reduce nerve stress and blood vessel damage.
Footwear, Hygiene, and Daily Habits
Wearing the right footwear protects sensitive nerves and prevents injuries. Choose shoes with cushioning, arch support, and enough room for toes to move freely. Avoid walking barefoot, especially if you already have reduced sensation.

Daily foot inspections are equally important. Look for blisters, redness, or swelling, and wash your feet gently with warm water and mild soap. Moisturize regularly to prevent cracking, which can lead to infection.

Physical activity like brisk walking, cycling, or swimming enhances blood flow to the lower extremities. Stretching exercises that flex the ankles and toes help keep nerves active and responsive.
Medical Screening and Professional Care
Regular medical checkups allow for early detection of underlying health conditions. For individuals with diabetes, consistent monitoring of blood sugar, cholesterol, and blood pressure helps reduce the risk of nerve damage.

Doctors may recommend blood tests to assess vitamin levels or nerve conduction studies to measure signal speed. Physical therapists and podiatrists can suggest orthotic devices or specialized footwear to improve comfort and prevent further nerve compression.
Comparison Table: Common Triggers vs. Prevention Methods
| Common Triggers of Neuropathy in Feet | Preventive or Protective Measures |
| High blood sugar (diabetes) | Maintain stable glucose levels through balanced meals, medication, and monitoring |
| Poor circulation or smoking | Exercise regularly, avoid tobacco, and manage cholesterol |
| Vitamin B12 or folate deficiency | Include fortified foods or supplements after medical advice |
| Alcohol or toxin exposure | Limit alcohol intake and use protective gear in chemical environments |
| Nerve compression or injury | Wear supportive shoes and use ergonomic posture when standing or walking |
| Certain medications | Discuss alternatives with your healthcare provider and monitor side effects |
| Chronic inflammation or obesity | Adopt anti-inflammatory diets and maintain a healthy weight |
This table shows how each trigger can be countered with a specific lifestyle or medical adjustment. Small daily actions like moving more, eating well, and checking your feet can protect you from long-term nerve pain.
Living Comfortably with Neuropathy
If neuropathy has already developed, managing symptoms is possible through consistent self-care and professional guidance. Treatment often includes a combination of medication, physical therapy, and home remedies to ease discomfort and maintain mobility.
Mild cases may respond to over-the-counter pain relievers, while doctors can prescribe medications like gabapentin or duloxetine to calm nerve pain. Some patients find relief through topical creams containing capsaicin or lidocaine.
Physical therapy strengthens muscles, improves coordination, and increases circulation to the lower limbs. Therapists may introduce balance exercises or gentle massage to stimulate nerves. Complementary approaches such as acupuncture, hydrotherapy, or low-impact yoga can also help relieve tension and improve overall comfort.
With consistent care, many people reduce pain, regain sensation, and maintain mobility despite neuropathy. The goal is not only to manage symptoms but to restore confidence in daily movement.
Holistic Habits That Support Nerve Recovery
Because nerve healing happens slowly, prevention and lifestyle management go hand in hand. Integrating the following habits can make a noticeable difference in how your feet feel and function.
- Stay Hydrated: Water helps transport nutrients that repair cells and maintain healthy blood viscosity.
- Manage Stress: Chronic stress triggers inflammation that may worsen nerve pain. Deep breathing, meditation, or journaling can help.
- Prioritize Sleep: Rest allows the body to regenerate and repair nerve tissue overnight.
- Avoid Extreme Temperatures: Protect your feet from hot water, heating pads, or icy surfaces to prevent accidental burns or frostbite.
- Regular Massage: Improves circulation, reduces stiffness, and keeps muscles supple around affected nerves.
These actions support your body’s natural ability to repair itself and keep you comfortable day to day.
When to Seek Medical Help
Sometimes neuropathy can signal a deeper issue that requires medical attention. If you experience sudden weakness, severe pain, or loss of coordination, seek professional evaluation promptly.
You should also see a doctor if:
- Numbness spreads rapidly or affects both legs.
- You notice changes in skin color or ulcers that do not heal.
- Pain worsens at night or interferes with sleep.
- You have diabetes and experience new or unusual sensations in your feet.
Early treatment is key. Neurologists, podiatrists, or endocrinologists can identify the cause, adjust medications, and recommend therapies to slow progression.
Foot Nerve Health: Protecting Your Steps for Life
Your feet carry you through thousands of steps every day, yet they’re often the first to reveal hidden health issues. Protecting them means protecting your independence and quality of life. Most forms of neuropathy can be avoided or significantly improved by managing blood sugar, staying active, eating nutritiously, and caring for your feet daily.
By paying attention to small warning signs and maintaining regular checkups, you can safeguard nerve health before symptoms become disabling. Consistent care allows you to walk, move, and live comfortably for years to come.
If you’re interested in building on this topic, explore related wellness strategies like improving circulation naturally or boosting nerve repair through nutrition. Each step you take toward healthier feet strengthens your body’s overall foundation for mobility and vitality.
Chronic lower back pain can slowly limit your ability to stand, walk, or live comfortably. For people with lumbar spinal stenosis (LSS), the MILD® (Minimally Invasive Lumbar Decompression) procedure has become a life-changing option. It’s minimally invasive, outpatient, and targets the root cause of nerve compression instead of just masking symptoms.
Most patients experience long-term relief lasting five years or more after a single MILD procedure, according to data shared by the Cleveland Clinic and studies published in the Pain Physician Journal (2018). The results often outlast injections and avoid the risks of open spine surgery.
This article explains how long does the MILD procedure last, why it works, how it compares to other options, and what you can expect after treatment.

Understanding the MILD Procedure
The MILD procedure is designed for patients diagnosed with lumbar spinal stenosis (LSS) , a condition where the spinal canal narrows and compresses nerves in the lower back. It’s especially common in adults over 50 due to thickened ligaments, bone overgrowth, or degenerative changes in the spine.
How It Works
During the procedure, a specialist uses a small incision (about the size of a baby aspirin) and advanced imaging guidance to remove small pieces of bone and excess ligament tissue. This opens more space for the spinal nerves without removing the bone structure that supports the spine.
Because it doesn’t involve stitches, implants, or general anesthesia, patients typically return home the same day.
The key advantage of MILD is that it treats the underlying structural problem without major surgery, helping patients walk farther, stand longer, and regain daily independence.
Who It’s Best For
MILD is ideal for people who:
- Have been diagnosed with lumbar spinal stenosis confirmed by MRI or CT scans.
- Experience leg pain or numbness when walking or standing (neurogenic claudication).
- Have not found relief from conservative treatments like physical therapy, medications, or injections.
- Want a minimally invasive option before considering laminectomy or spinal fusion.
In short, MILD fits the “in-between” group, those who need more than pain management but aren’t ready for open surgery.
How Long Does the MILD Procedure Last?
This is one of the first questions most patients ask: How long does the mild procedure last?
The answer depends on your overall spinal health, activity level, and how well you follow post-treatment recommendations. However, multiple clinical studies show MILD offers durable relief that can last five years or longer for most patients.
Clinical Evidence and Longevity
A 2018 multicenter study published in the Pain Physician Journal tracked patients up to five years after undergoing MILD. Over 88% avoided open back surgery, and their improvements in walking distance and pain scores were sustained throughout the follow-up period.
Similarly, the Cleveland Clinic reports that many patients enjoy lasting relief and better mobility without needing additional procedures. Because the thickened ligament doesn’t grow back quickly, the decompression achieved with MILD remains stable for years.
More recent findings from The Spine Journal echo these results, showing that patients maintained significant pain reduction and improved function five years post-procedure. Importantly, no major structural regressions were observed during long-term imaging follow-ups.
For a broader scientific overview, a PRISMA-compliant meta-analysis published in Pain Physician Journal concluded that MILD is both effective and safe for patients with ligamentum flavum hypertrophy, with consistently low complication rates.
Additionally, a long-term review on PMC supports sustained relief and minimal adverse effects for more than two years following MILD, confirming its role as a durable, minimally invasive option.
Why the Results Last
The durability of the MILD procedure comes from its targeted removal of ligamentum flavum, the tissue that thickens and narrows the spinal canal. Once trimmed, there’s significantly less pressure on spinal nerves, and since the bone structure remains intact, there’s little risk of instability.
In contrast, treatments like steroid injections provide only temporary inflammation relief. MILD changes the anatomy permanently, which is why the benefits last so long.
Typical Long-Term Outcomes
Here’s what most patients experience over time:
- 0–6 months: Noticeable pain reduction and increased walking endurance.
- 1 year: Continued improvement in posture and stamina.
- 3–5 years: Stable relief with no return of severe stenosis symptoms.
- 5+ years: Most patients maintain results, though some may need additional therapy if arthritis or other degenerative issues progress.
In many cases, MILD provides a long-term solution that delays or eliminates the need for open decompression surgery.
Comparing MILD to Other Back Pain Treatments
Patients often wonder how MILD stacks up against traditional spine surgeries or non-surgical options like epidural injections. The comparison below highlights major differences in procedure type, recovery, and long-term effectiveness.
Comparison Table: MILD vs. Other Treatments
| Treatment Type | Invasiveness | Typical Recovery Time | Duration of Relief | Key Advantages |
| MILD Procedure | Minimally invasive (tiny incision) | 24–48 hours of rest; normal activity in a few days | Up to 5 years or more | Treats root cause without removing bone; no implants or stitches |
| Epidural Steroid Injections | Non-surgical | Same day | Weeks to 6 months | Fast relief; suitable for mild to moderate pain |
| Traditional Laminectomy | Open surgery under general anesthesia | 6–12 weeks | 10+ years, but higher risk | Removes bone and thickened ligament; effective but more invasive |
This comparison shows that MILD fills the gap between short-term relief and major surgery, giving patients meaningful improvement without long recovery or hospitalization.
When MILD Is the Better Choice
MILD is typically recommended when:
- You’ve already tried injections or physical therapy with limited success.
- MRI results show ligament thickening rather than major bone overgrowth.
- You’re medically unfit or unwilling to undergo open surgery.
By providing sustained decompression with minimal disruption, MILD allows patients to enjoy daily life again without the downtime that traditional surgery requires.
Recovery, Results, and Lifestyle After MILD
After MILD, recovery is straightforward and often surprisingly quick. Most patients resume light activities within a few days and notice improvements in walking and standing within two to six weeks.
The Recovery Timeline
- Day 1–2: Mild soreness at the incision site. Rest and light walking are encouraged to maintain circulation.
- Week 1: Most people reduce or stop pain medications. Some begin gentle stretching or physical therapy.
- Weeks 2–6: Noticeable reduction in leg pain and improved mobility. Patients often report standing longer and walking farther before symptoms return.
- Months 3–6: Maximum benefits are typically achieved. Activities like gardening, errands, and exercise become easier.
Patients can usually return to work and daily routines within a few days, making MILD one of the fastest recoveries among spinal procedures.
Follow-Up Care and Long-Term Maintenance
Maintaining results after MILD is simple but important. Doctors usually recommend:

- Regular follow-up visits: Periodic check-ins help ensure symptoms remain controlled and healing continues as expected.
- Physical therapy: Gentle core strengthening stabilizes the lower back and improves posture.
- Ergonomic adjustments: Using lumbar cushions, supportive shoes, and adjustable seating can minimize strain.
- Healthy habits: A balanced diet, weight management, and daily movement help slow future degeneration.
- Avoiding high-impact stress: Limit repetitive bending or heavy lifting to protect spinal stability.
Most patients find that a few small lifestyle changes extend the benefits of the procedure for years.
What Patients Say
Clinical feedback consistently shows high satisfaction. In one 2022 Pain Practice Journal report, over 85% of patients described MILD as life-changing, citing greater walking distance and fewer pain medications. Many said they regained independence and postponed the need for traditional surgery indefinitely.
These testimonials align with findings from The Spine Journal, where researchers noted that MILD patients maintained improved function up to five years post-treatment.
Is the MILD Procedure Right for You?
Choosing the right treatment depends on your diagnosis, symptom severity, and personal goals. MILD offers a middle-ground solution for people who want something more lasting than injections but less invasive than surgery.
Ideal Candidates
You may be a good candidate if:
- You experience pain, tingling, or numbness in the legs while standing or walking that eases when sitting.
- Imaging confirms hypertrophy (thickening) of the ligamentum flavum, the tissue that compresses spinal nerves.
- You’re seeking a long-term fix without hospitalization or implants.
Doctors typically perform MILD in an outpatient setting under local anesthesia, which means lower risks for older adults or those with other medical conditions. Most procedures take about 60 minutes, and you go home the same day.
How MILD Differs from Temporary Treatments
While epidural steroid injections can ease inflammation, their effect fades in months. Physical therapy helps with flexibility but can’t reverse structural narrowing. Pain medications provide symptom control but do not treat the cause.
MILD corrects the mechanical source of nerve compression, delivering measurable and lasting relief often confirmed through post-procedure imaging showing an expanded spinal canal.
Insurance and Cost Considerations
MILD is FDA-cleared and covered by Medicare and most major insurance plans for qualified patients. Costs vary by location, but since it’s outpatient, total expenses are typically far less than for open spine surgery. Many patients value that it reduces pain, mobility issues, and future healthcare costs.
Atlas Pain Specialists mild® Procedure
If you’re considering the MILD procedure, finding an experienced, board-certified pain management specialist is essential. Atlas Pain Specialists offers the mild® Procedure as part of its advanced treatment program for lumbar spinal stenosis. Their team uses state-of-the-art imaging, personalized evaluation, and minimally invasive techniques to restore spinal space and reduce nerve pressure safely.
The procedure takes less than an hour and requires only a small incision, no general anesthesia, implants, or stitches. Patients typically walk the same day and return to normal activities within days.
For lasting relief, precision care, and proven outcomes, Atlas Pain Specialists provides one of the most trusted approaches to the mild® Procedure. Visit their site to learn more about eligibility, preparation, and recovery guidance tailored to your spinal health needs.
Pain on the inner side of the knee can range from a mild ache after activity to sharp discomfort that limits movement. This area, known as the medial knee region, includes several structures that absorb force, stabilize motion, and bear significant body weight.
When any of these tissues become irritated, injured, or degenerated, even simple movements like climbing stairs or getting out of a chair can cause distress. Persistent discomfort often reflects deeper mechanical or inflammatory problems that deserve careful attention.
Accurate assessment of medial knee pain helps determine whether it stems from joint wear, ligament strain, or inflammation of nearby soft tissues. With precise diagnosis and targeted management, most individuals regain comfort and prevent chronic complications.
Causes Of Pain On Medial Side Of Knee
The medial knee houses ligaments, cartilage, tendons, and bursae that each play a role in stability and load transfer. When one of these components becomes compromised, pain tends to localize sharply along the inner joint line.

| Cause | Description | Typical Triggers or Risk Factors | Pain Characteristics |
| MCL Injury | Stretching or tearing of the inner stabilizing ligament. | Sports impact, sudden twists. | Sharp medial pain, swelling, instability. |
| Meniscus Tear | Damage to inner cartilage cushion. | Deep bending, pivoting under load. | Clicking, catching, pain during rotation. |
| Pes Anserine Bursitis | Inflammation of bursa below joint. | Overuse, tight hamstrings, obesity. | Local tenderness below the joint line. |
| Osteoarthritis | Cartilage thinning in the medial compartment. | Aging, repetitive load, past trauma. | Dull ache, stiffness, morning discomfort. |
| Medial Plica Syndrome | Irritation of inner knee fold. | Repetitive flexion, overuse. | Snapping, mild swelling, intermittent pain. |
Common causes include acute injuries such as ligament sprains and cartilage tears, as well as gradual conditions like osteoarthritis and bursitis. Each presents distinct symptoms and treatment priorities depending on the underlying tissue involved.
- Medial Collateral Ligament (MCL) Injury
The medial collateral ligament stabilizes the inner knee against sideways pressure. Sudden twisting or direct blows during sports frequently strain or tear this ligament.
Pain from an MCL injury appears immediately after the incident and may worsen with sideward motion. Mild sprains often improve with rest, while severe tears sometimes require bracing or rehabilitation guided by a physiotherapist.
A diagnostic examination usually includes the valgus stress test, where outward pressure on the knee reproduces pain if the MCL is compromised. Recovery depends on injury grade, with early protection and progressive strengthening supporting full return to activity.
- Medial Meniscus Tear
The meniscus is a cartilage disc that cushions and stabilizes the knee joint. The medial meniscus endures higher forces than the outer counterpart, making it prone to tears.
Degenerative wear or a sudden twist while bearing weight can cause the cartilage to tear, producing sharp pain and occasional locking. Symptoms often worsen with squatting, pivoting, or prolonged standing.
Diagnosis may involve MRI imaging to confirm the tear pattern and extent. Treatment ranges from physiotherapy and anti-inflammatory measures to arthroscopic repair in cases with mechanical blockage.
- Pes Anserine Bursitis
Below the joint line lies a small fluid-filled sac called the pes anserine bursa. Its purpose is to reduce friction between tendons and the bone during knee movement.
Repetitive stress, obesity, or tight hamstrings can inflame this bursa, leading to localized swelling and pain below the inner knee. Tenderness usually intensifies during stair climbing or side-lying positions at night.
Initial management involves rest, ice application, and targeted stretching to reduce friction on the affected area. If symptoms persist, corticosteroid injections or physiotherapy focusing on muscle balance may be considered.
Key Symptoms and Diagnostic Clues
Medial knee pain can mimic multiple conditions that share overlapping sensations. Differentiating among them relies on precise clinical evaluation and targeted testing.
Doctors assess joint alignment, palpate the tender region, and may perform movement-based tests to reproduce pain. Imaging such as X-rays or MRI clarifies structural changes when physical signs are inconclusive.
Characteristic Pain Patterns
Pain at the inner joint line often reflects cartilage or ligament injury. Sharp localized tenderness indicates mechanical involvement rather than diffuse inflammation.
Patients sometimes report a catching or locking feeling when a meniscus tear interferes with smooth motion. Swelling limited to the inner region commonly suggests bursitis or minor sprain rather than generalized joint fluid buildup.
Associated stiffness after inactivity typically accompanies degenerative processes like osteoarthritis. These observations guide clinicians toward more precise testing before intervention begins.
| Indicator | Possible Cause | Notes |
| Pain on twisting | Meniscus tear | Often produces clicking or locking. |
| Tenderness on inner joint line | Osteoarthritis or meniscus lesion | Worsens after activity. |
| Pain below joint line | Pes anserine bursitis | Increases with climbing or kneeling. |
| Valgus stress reproduces pain | MCL injury | Confirms ligament instability. |
| Stiffness easing with motion | Osteoarthritis | Indicates chronic cartilage wear. |
Relief and Treatment
Effective treatment depends on cause, severity, and the patient’s activity level. Most cases improve with non-surgical interventions emphasizing rest, strength, and controlled movement.
Doctors often begin with conservative management before considering injections or surgery. The goal is to relieve discomfort while preserving long-term knee function.
- Home and Conservative Care
Initial relief often involves the RICE protocol: rest, ice, compression, and elevation. These measures reduce inflammation and limit swelling in the early stages.
Supportive braces may stabilize the knee and prevent excessive side movement during recovery. Over-the-counter anti-inflammatory medication can help ease pain in mild injuries.
Consider:
- Limiting activities that cause twisting or sideward strain.
- Applying ice for 15–20 minutes several times daily.
- Using a soft brace if recommended by a professional.
- Avoiding prolonged immobilization to prevent stiffness.
- Physical Therapy and Exercise
Therapeutic programs aim to restore strength, flexibility, and joint alignment. Exercises typically focus on quadriceps, hamstrings, and hip stability.
A physiotherapist tailors routines to avoid aggravating sensitive areas. Gradual load progression ensures tissue adaptation without overstrain.
Popular exercises include wall sits, hamstring curls, and step-ups under professional supervision. Balance training also enhances proprioception, lowering reinjury risk once normal activity resumes.
- Medical and Surgical Interventions
When conservative care fails, physicians may recommend targeted injections or minimally invasive surgery. These options are reserved for persistent or structural causes of pain.
| Approach | Purpose | Examples |
| Rest and Load Control | Reduces stress on healing tissue. | Short rest followed by gradual activity. |
| Ice and Compression | Limits inflammation. | 15–20 minutes several times per day. |
| Physical Therapy | Restores motion and strength. | Muscle balancing, flexibility work. |
| Bracing or Taping | Improves stability. | Hinged braces for MCL support. |
| Medication | Eases pain and swelling. | NSAIDs, topical gels. |
| Injections | Reduces chronic inflammation. | Corticosteroid or hyaluronic acid. |
| Surgery | Repairs structural damage. | Meniscus repair or realignment. |
Corticosteroid injections can temporarily reduce inflammation in bursitis or arthritis. Hyaluronic acid may improve joint lubrication and mobility in degenerative cases.
Surgical repair or removal of torn meniscus fragments is considered when locking or mechanical instability interferes with daily function. Early rehabilitation after surgery preserves joint motion and strength.
How to Prevent Future Knee Pain
Preventing medial knee pain involves maintaining strength, flexibility, and proper movement mechanics. These measures reduce repetitive strain on vulnerable inner structures.
Lifestyle choices like balanced exercise routines and joint-friendly footwear contribute significantly to protection. Consistency in care yields lasting comfort and mobility.
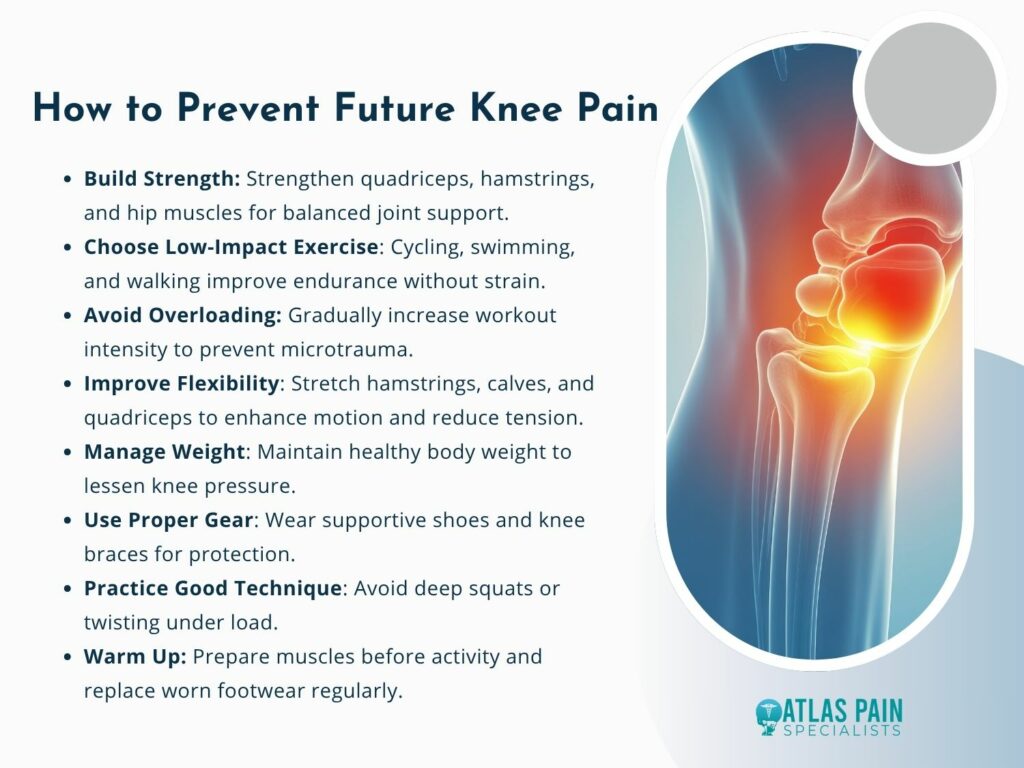
- Strength and Conditioning
Strong muscles support and offload stress from the knee joint. Balanced training of quadriceps, hamstrings, and hip abductors provides symmetrical control.
Low-impact activities such as cycling, swimming, and brisk walking build endurance without overloading the joint. Avoiding sudden intensity spikes helps prevent recurrent microtrauma.
Regular assessment of movement form ensures alignment during both exercise and daily tasks. Even minor posture corrections can meaningfully reduce medial strain.
- Flexibility and Weight Control
Tight muscles alter knee mechanics and contribute to bursitis or ligament tension. Stretching of hamstrings, calves, and quadriceps enhances range of motion.
Weight management lowers compressive forces that accelerate cartilage wear. A moderate calorie intake with nutrient-rich food supports overall joint health.
Professional guidance from a physiotherapist or trainer ensures proper technique and progress monitoring. Sustainable habits outperform occasional corrective efforts.
- Protective Equipment and Technique
Athletes and workers benefit from using knee supports when engaging in repetitive or high-impact tasks. Proper footwear with supportive midsoles maintains leg alignment.
Avoiding deep squats or twisting under heavy load prevents strain on ligaments and cartilage. Gradual warm-up routines prepare soft tissues for movement.
Remember:
- Warm up before intense activity.
- Replace worn footwear regularly.
- Maintain even leg strength and posture awareness.
When to Seek Medical Evaluation
Ongoing pain on the inner side of the knee should not be dismissed as a simple strain or temporary soreness. Medical evaluation helps identify tissue injury, inflammation, or early degeneration before these issues worsen.
Even mild symptoms can mask damage to ligaments, cartilage, or the joint lining. Timely consultation with a healthcare provider ensures that the underlying cause receives appropriate and precise treatment.
- Identify Signs Early
Certain symptoms indicate a need for immediate medical attention. Sudden swelling, bruising, or a sensation of tearing often points to meniscus or ligament injury.
A popping sound during motion or loss of stability suggests structural disruption inside the joint. Difficulty bearing weight or locking during flexion may signal mechanical obstruction from loose fragments or displaced tissue.
Redness, warmth, or fever around the knee can imply infection or inflammatory disease. In these cases, prompt diagnosis prevents joint damage and reduces the risk of long-term complications.
- When Chronic Pain Persists
Pain that lasts longer than two weeks or worsens with activity can indicate degenerative or inflammatory processes. Osteoarthritis, tendinopathy, and synovial irritation commonly present with dull, recurring discomfort.
Morning stiffness, grinding sensations, or clicking sounds often accompany cartilage thinning or irregular joint surfaces. Without timely management, these mechanical changes may limit range of motion and increase fatigue during walking or climbing.
Recurrent swelling after moderate exertion suggests underlying joint instability or poor alignment. Continuous irritation in the same region warrants orthopedic review for targeted treatment and corrective exercises.
- Diagnostic Steps and Professional Assessment
Physicians begin by evaluating movement patterns, palpating the joint, and testing flexibility. These manual assessments provide essential clues about which structures contribute to pain.
Imaging tests like X-rays, ultrasound, or MRI reveal the extent of tissue injury or degeneration. MRI scans are especially useful for detecting meniscal tears, cartilage wear, and inflammation around tendons or ligaments.
Blood tests may accompany imaging if infection or systemic inflammation is suspected. Identifying biochemical markers helps guide medication and rehabilitation decisions.
Benefits of Early Medical Intervention
Prompt evaluation enables precise diagnosis and prevents mild symptoms from escalating into chronic conditions. Early treatment often limits inflammation and protects surrounding tissues from overcompensation strain.
Professional care helps establish structured recovery through physical therapy and supervised exercise. This approach reduces pain while restoring coordination, flexibility, and confidence in movement.
Ignoring early warning signs can extend recovery time and increase the likelihood of reinjury. Seeking timely medical input keeps the healing process efficient and minimizes long-term joint stress.
Hurts to Straighten Knee? Here's What You Need To Know
Experiencing inner knee pain shows how balance, alignment, and tissue resilience determine overall joint comfort. Careful evaluation and early treatment can restore smooth motion and prevent recurring discomfort.
As pain subsides, attention to movement quality and muscular stability becomes essential for long-term relief. Consistent rehabilitation and joint-friendly activity preserve strength while protecting the inner structures of the knee.
Effective recovery depends on sustained awareness of daily movement habits and posture. When managed thoughtfully, the knee regains stability, allowing confidence in movement without lingering pain.
Thoracic Outlet Syndrome (TOS) can be both frustrating and confusing. It often starts subtly, a tingling in the fingers, a dull ache in the shoulder, or numbness down the arm, and is frequently mistaken for more common issues like carpal tunnel syndrome or a pinched nerve in the neck.
The truth is, TOS is caused by compression of nerves or blood vessels in the small space between your collarbone and first rib known as the thoracic outlet. Depending on which structures are affected, symptoms can range from mild discomfort to severe pain, weakness, and circulation problems.
The key to successful thoracic outlet syndrome treatment lies in identifying the exact cause of the compression and tailoring therapy to relieve pressure while restoring healthy movement and posture. From physical therapy and medication to injections and surgery, several treatment options can bring relief and help prevent long-term complications.

Physical Therapy: The First Line of Care
For most patients, physical therapy (PT) serves as the first and most effective step in managing TOS. Since posture and muscle imbalance play a central role in compressing the thoracic outlet, PT focuses on correcting these underlying issues. A trained physical therapist will perform a detailed assessment of your shoulder alignment, neck mobility, and daily habits to determine what’s contributing to the nerve or vessel compression.
The main goal of physical therapy for thoracic outlet syndrome is to strengthen and stretch key muscle groups to restore balance, improve posture, and increase the space where nerves and blood vessels pass. Exercises often target the scalene, pectoralis minor, and trapezius muscles, which are known to become tight or weak in people with TOS.
Typical exercises include gentle neck stretches, shoulder shrugs, chin tucks, and band-assisted rows. Over time, these help realign the collarbone, lift the chest, and reduce pressure in the thoracic outlet. In some cases, manual therapy such as myofascial release or joint mobilization is added to ease stiffness in the upper ribs and spine.

Postural Corrections and Ergonomic Adjustments
Posture correction goes beyond the clinic. Your therapist may review how you sit, stand, and sleep. For desk workers, raising your computer monitor to eye level, relaxing the shoulders, and keeping elbows close to the body can significantly ease strain. For drivers, adjusting the seat height and steering wheel angle helps reduce forward shoulder rotation a common trigger for TOS.
Consistency is essential. Patients who practice their prescribed stretches daily and incorporate ergonomic adjustments often report noticeable improvements within six to eight weeks. While results vary, physical therapy remains the safest and most sustainable path to recovery for most TOS cases.

Medications and Pain Management For Thoracic Outlet Syndrome
When pain, inflammation, or nerve irritation becomes too uncomfortable, medications can provide temporary relief and make therapy more tolerable. The goal isn’t to mask symptoms but to create a pain-free window that allows you to stay active and committed to long-term rehabilitation.
Pain management for thoracic outlet syndrome involves controlling inflammation, reducing muscle tension, and calming irritated nerves so functional recovery can continue. Nonsteroidal anti-inflammatory drugs (NSAIDs) such as ibuprofen, naproxen, or meloxicam are typically the first line of treatment. These help reduce swelling and relieve mild to moderate pain, especially when symptoms flare after repetitive motion.

For nerve-related discomfort, like burning, tingling, or numbness, doctors may prescribe neuropathic agents such as gabapentin or pregabalin. These medications target the overactive nerve signals that contribute to chronic pain. In cases where muscle spasm contributes to compression, short-term use of muscle relaxants may be helpful.
It’s important to note that medications don’t cure the root cause of TOS. They serve as complementary tools alongside therapy, posture work, and lifestyle changes. Patients are usually advised to use them for a limited period under medical supervision to avoid side effects or dependency.
Lifestyle Modifications for Lasting Relief
Beyond medical and physical interventions, daily habits often make or break recovery from thoracic outlet syndrome. Small, mindful adjustments to your lifestyle can prevent the compression from worsening and support healing over time.
Lifestyle modification in thoracic outlet syndrome treatment is about reducing strain on the neck, shoulders, and upper chest while promoting balance, circulation, and flexibility. If you’re used to carrying heavy bags on one shoulder, switching sides or using a backpack distributes weight evenly and prevents additional pressure. Likewise, sleeping with arms above your head or propped on high pillows can aggravate nerve compression, so a neutral sleeping posture is recommended.
Your job or hobbies may also play a role. Repetitive tasks like painting, typing, or assembly-line work can tighten the muscles surrounding the thoracic outlet. Taking regular breaks, stretching your shoulders, and rotating your activities throughout the day can significantly reduce tension.
Another crucial element is staying physically active. Low-impact activities such as swimming, walking, or yoga (with therapist approval) keep the upper body flexible and improve blood flow. Some patients also benefit from deep breathing exercises that gently expand the chest cavity, creating more space for nerves and vessels.
These modifications might seem simple, but over time, they enhance the effects of therapy and lower the risk of recurrence. Recovery often depends as much on what you do at home and work as what happens in the clinic.


Minimally Invasive Treatments
When conservative options provide only partial relief, doctors may recommend minimally invasive procedures, such as injections. These serve both diagnostic and therapeutic purposes, helping confirm the source of compression while offering pain reduction that supports ongoing rehabilitation.
Injections for thoracic outlet syndrome are designed to target inflammation or muscle tightness directly at the site of compression, providing temporary but meaningful relief. They are particularly useful for patients with muscle-based (neurogenic) TOS, where tight scalene or pectoralis muscles are the main culprits.
1. Botulinum Toxin (Botox) Injections
Botox injections temporarily relax overactive muscles, especially the scalene or pectoralis minor, that are pressing against nerves or vessels. The effects last about three to four months, giving patients time to continue physical therapy with reduced pain and improved mobility. Botox can also serve as a diagnostic tool; if symptoms improve after injection, it confirms that muscle tension is the likely cause.
2. Corticosteroid Injections
Corticosteroids are powerful anti-inflammatory agents. Injecting them near compressed nerves can reduce swelling and irritation, easing pain for several weeks or months. This approach is particularly helpful for patients who need symptom relief to stay active in therapy. However, steroids are not a long-term solution and are used sparingly due to potential side effects like tissue thinning.
3. Nerve Blocks
A nerve block involves injecting a local anesthetic near the affected nerves to temporarily stop pain signals. Beyond providing short-term relief, nerve blocks also help doctors identify which nerve pathways are involved. If pain disappears after the injection, it indicates that the targeted area is the true source of the problem, guiding future treatment decisions.
While injections can be highly effective, they are best viewed as one component of a larger care plan. Your healthcare provider will assess whether you are a good candidate based on your symptom pattern, response to previous therapy, and imaging results.
Surgical Options for Severe Cases
In rare cases, when non-surgical approaches fail or when vascular compression causes serious complications like blood clots or circulation loss, surgery becomes necessary. Surgical intervention aims to physically remove or relieve whatever is compressing the thoracic outlet.
Surgical thoracic outlet syndrome treatment is reserved for patients with persistent symptoms or vascular compromise, and it focuses on eliminating the structural causes of compression. Depending on the specific type of TOS (neurogenic, venous, or arterial) different procedures are performed.
- For Neurogenic TOS: The most common type, surgery may involve removing the first rib (first rib resection) or cutting the scalene muscles (scalenectomy) to relieve pressure on nerves.
- For Venous or Arterial TOS: Surgeons may repair or reconstruct damaged blood vessels and remove any abnormal tissue or bone spurs contributing to the blockage.
These procedures can be done through a small incision near the collarbone or under the arm, depending on the surgeon’s approach. Postoperative recovery involves physical therapy to restore shoulder motion and rebuild strength. Most patients notice gradual symptom relief over several months.
As with any surgery, there are risks, such as infection, nerve injury, or persistent pain, but with modern techniques and skilled surgical teams, outcomes are generally favorable when the indication is clear and rehabilitation is followed faithfully.

Complementary and Alternative Therapies
While conventional medicine forms the foundation of TOS management, many patients turn to complementary therapies to ease discomfort and enhance recovery. Complementary treatments for thoracic outlet syndrome focus on promoting relaxation, improving circulation, and reducing muscle tension to complement medical care. Acupuncture, for instance, uses fine needles to stimulate blood flow and release muscle knots, potentially reducing pain intensity.
Chiropractic adjustments, when performed by practitioners familiar with TOS anatomy, can help realign the spine and shoulders. Similarly, massage therapy and myofascial release target tight connective tissues, encouraging flexibility and better posture. Another emerging option is dry needling, a technique that targets specific trigger points to deactivate muscle spasms and restore movement.

Patients often pair these treatments with traditional therapy for a more holistic approach. Though not all complementary therapies have strong clinical evidence, many individuals report subjective improvement in pain levels and function. It’s always best to consult your healthcare provider before starting alternative treatments to ensure they’re safe and compatible with your current plan.
Should You Consider Injections for Pain Relief?
For some people, the most challenging part of managing TOS is persistent pain that resists therapy and medication. In such cases, injections may offer a bridge between conservative and surgical options. Injections play a valuable role in thoracic outlet syndrome treatment by providing targeted, temporary relief that allows patients to continue progress in physical therapy and daily life. They can help break the pain cycle, improve range of motion, and provide diagnostic clarity about the root cause.
However, injections should be viewed as supportive tools rather than standalone solutions. They don’t correct posture, muscle imbalance, or anatomical abnormalities. The best results come when injections are paired with ongoing exercises, ergonomic changes, and medical supervision.
If your symptoms remain severe despite months of therapy, your physician might recommend an imaging-guided injection to confirm muscle involvement or relieve inflammation. The decision should always be made collaboratively, weighing the benefits against potential risks like temporary soreness or rare allergic reactions.
Ultimately, the goal of TOS treatment, whether through therapy, injections, or surgery, is not just to stop pain but to restore full and confident use of your arms and shoulders. With patience, consistent effort, and the right multidisciplinary approach, long-term relief is achievable.
Finding a comfortable sleeping position when you have sacroiliac (SI) joint pain can feel impossible. The wrong posture can trigger sharp aches that travel from your lower back to your hips and thighs, disrupting your rest.
The right position, however, can ease pressure on the joint, reduce inflammation, and help you wake up with less stiffness. The best sleeping position for sacroiliac joint pain relief usually involves supporting your spine’s natural curve and preventing your hips from twisting. With a few practical adjustments and the right pillows, restful sleep becomes possible again. Let's dive into the best sleeping positions for sacroiliac joint pain relief .
Understanding Sacroiliac Joint Pain
The sacroiliac joints sit where the base of your spine meets your pelvis. These small but powerful joints transfer weight from the upper body to the legs, stabilizing you when you walk, bend, or stand. When inflammation or misalignment occurs, even small movements can cause deep pain on one or both sides of the lower back.
SI joint pain can stem from several causes such as arthritis, pregnancy, injury, or prolonged poor posture. Sleeping in awkward positions that twist the pelvis can worsen symptoms overnight. People often describe the discomfort as a dull ache that intensifies when they roll over or get out of bed.
The key to sleeping comfortably with SI joint pain is maintaining alignment between your spine, hips, and legs so the joint remains neutral rather than strained. Good sleep posture supports recovery by reducing mechanical stress on this sensitive area.
Best Sleeping Positions for Sacroiliac Joint Pain Relief
Everyone’s body is different, so finding the right position may take some trial and error. However, certain postures consistently reduce tension on the sacroiliac joints and promote proper spinal alignment. Supportive pillows and a medium-firm mattress often make these positions even more effective.
Side Sleeping with a Pillow Between the Knees

Side sleeping is one of the most recommended positions for SI joint pain relief. When you lie on your side, the pelvis can easily rotate or tilt, which puts uneven stress on the sacroiliac joint. Placing a firm pillow between your knees helps keep your hips stacked and your spine aligned from shoulders to knees.
If your pain is worse on one side, try sleeping on the opposite side to reduce direct pressure on the affected joint. You can also tuck a small pillow under your waist to support your midsection and prevent sagging.
This position keeps the pelvis stable and reduces strain on the lower back, promoting even weight distribution throughout the night.
How to Set It Up:
- Lie on your side with both knees slightly bent.
- Place a supportive pillow between your knees so they remain hip-width apart.
- Hug a second pillow to your chest for upper-body balance.
- If you notice a gap at your waist, fill it with a small cushion for spinal support.
This setup minimizes twisting and works especially well for individuals with one-sided SI pain or hip tightness.
Back Sleeping with Knee Support

Sleeping on your back allows your weight to spread evenly, relieving direct pressure from the sacroiliac area. However, lying flat can sometimes cause your lower spine to arch excessively, irritating the joints. Placing a pillow or wedge under your knees flattens that curve and keeps your pelvis neutral.
Some people prefer using a contoured memory-foam pillow under the knees to maintain stable support. Others find that slightly elevating the legs with an adjustable bed base eases pain further.
Back sleeping with knee elevation helps reduce the compressive forces that aggravate sacroiliac joint inflammation. It also promotes circulation and minimizes morning stiffness.
Try this setup:
- Use a medium-firm mattress that supports the natural curve of your lower back.
- Place a thick pillow under your knees and another beneath your head and neck.
- Keep your arms relaxed at your sides or rest them on your abdomen.
If you tend to snore, slightly raising your upper body with an adjustable bed or wedge pillow can make breathing easier while preserving hip alignment.
Modified Fetal Position for Comfort
A modified fetal position can work for people who prefer curling slightly while sleeping. It relieves tension in the lumbar region while keeping the hips relatively aligned. To avoid straining the sacroiliac joint, avoid curling too tightly. The key is a relaxed curve, not a deep hunch.
Placing a pillow between the knees and one behind your back for support keeps your pelvis from rotating. Some people also benefit from hugging a long body pillow, which prevents rolling into awkward angles during the night.
The modified fetal position reduces lower-back tension while maintaining hip symmetry and promoting deep relaxation.
Quick Comparison: Best Positions for SI Joint Pain
| Sleeping Position | Benefits | Ideal For |
| Side with Pillow Between Knees | Aligns hips and reduces rotation | One-sided or pregnancy-related SI pain |
| Back with Pillow Under Knees | Evenly distributes weight, relaxes spine | Bilateral SI pain or stiffness |
| Modified Fetal Position | Comforts lumbar area, prevents twisting | Restless sleepers or those needing full-body support |
Using these setups consistently can make a noticeable difference in how you feel when you wake up. The right position not only relieves pain but also improves sleep quality by keeping muscles relaxed.
Avoiding Positions That Make SI Joint Pain Worse
While supportive postures can soothe your joints, certain sleeping habits can make symptoms worse. Being mindful of these can prevent overnight flare-ups and long-term irritation.
Stomach Sleeping
Lying on your stomach twists the pelvis and strains the lower back. This position forces one side of the hip to lift higher, putting uneven tension on the sacroiliac joint. Over time, it can lead to chronic tightness and nerve irritation.
If you cannot avoid stomach sleeping, place a thin pillow under your hips and use a very flat pillow or none at all under your head. This helps reduce the spinal curve, though side or back sleeping remains the better option.
Uneven Mattress or Pillow Setup
A sagging mattress or an overly soft bed can sink your hips too deeply, causing misalignment through the night. The same happens if you use pillows that are too high or too flat. A medium-firm mattress with adaptive foam or hybrid support is ideal for maintaining even pressure on the spine and pelvis.
If you notice more pain in the morning, check for dips or wear spots on your mattress and consider adding a firm topper or replacing the mattress entirely.
Twisting Movements in Bed
Turning abruptly or sleeping with one leg bent across the other can trigger sacroiliac joint irritation. To minimize twisting, keep both legs together when rolling over and move your upper and lower body simultaneously. You can also use a long body pillow to prevent your top leg from sliding forward during the night.
Avoiding poor sleeping positions is as important as finding the right ones. Maintaining consistency each night trains your body to stay in a neutral alignment, which reduces inflammation and supports healing.
Additional Tips for Nighttime SI Joint Relief
Comfortable sleeping positions are just part of the solution. Lifestyle and bedtime adjustments can further ease pain and help you rest better.
Stretching and Mobility Before Bed
Gentle stretches before bedtime relax tight muscles around the hips and lower back. Focus on the glutes, hamstrings, and hip flexors. Try movements like:
- Knee-to-chest stretch: Pull one knee toward your chest while lying on your back, hold for 20 seconds, and switch sides.
- Piriformis stretch: Sit with one ankle over the opposite knee and lean forward slightly to feel a stretch in your outer hip.
These light stretches increase flexibility and reduce tension that can pull on the sacroiliac joint during sleep.
Choosing the Right Mattress and Pillows
Your mattress can either support your recovery or worsen pain. Choose one that balances comfort and firmness, ideally medium-firm, so it conforms to your body without sagging. Memory-foam or latex hybrids tend to offer the best combination of contouring and stability.
Pillows should maintain neck alignment and support the natural curve of your spine. A contoured cervical pillow or wedge can be helpful for back sleepers, while side sleepers should choose a pillow thick enough to keep the neck in line with the shoulders.
Investing in proper bedding is one of the most effective ways to reduce nightly SI joint discomfort.
Use Heat or Ice Before Bed
Applying a heating pad or warm compress for 15 minutes before sleep can loosen tight muscles and improve circulation. For acute inflammation, a brief cold compress can calm the joint and minimize swelling. Alternate between heat and ice if needed, depending on how your body responds.
Maintain Healthy Sleep Hygiene
Small changes in your bedtime routine can enhance rest and minimize tossing and turning:
- Go to bed and wake up at consistent times.
- Avoid heavy meals and caffeine close to bedtime.
- Keep your bedroom cool and dark.
- Limit screen time to reduce muscle tension from prolonged sitting or phone use.
Creating a calm environment allows your muscles to relax fully, reducing the likelihood of nighttime joint flare-ups.
Morning Transition Tips
How you get out of bed matters too. Rolling to one side, bending your knees, and using your arms to push yourself upright prevents sudden pressure on the sacroiliac joint. Stretch gently once you stand to awaken the supporting muscles before walking.
Combining proper posture, supportive bedding, and nightly self-care practices maximizes pain relief and helps restore a natural sleep rhythm.
How To Relieve Hand Pain at Night with Simple Techniques
If your lower back is not the only area disturbing your sleep, nighttime hand pain can be just as disruptive. Many people who find relief from sacroiliac joint pain later struggle with numbness or tingling in their wrists or fingers. These symptoms often result from nerve compression, poor circulation, or repetitive strain.
The same principle that applies to your lower back alignment applies to your hands and wrists. Keeping your joints neutral during rest prevents unnecessary pressure. Wearing soft wrist splints at night, doing gentle hand stretches before bed, and avoiding sleeping with wrists bent under your pillow can make a noticeable difference.
Applying a warm compress before sleep or gently massaging your hands with lotion can also improve circulation. If you use your hands heavily during the day, consider alternating heat and cold therapy to calm inflammation.
Improving sleep posture throughout your body, not just your lower back, is the foundation of overall joint health. With consistent habits and mindful positioning, you can reduce discomfort from both sacroiliac joint pain and nighttime hand aches helping you sleep soundly and wake up ready to move freely again.
Menopause joint pain is best managed through a mix of healthy lifestyle habits, targeted exercise, balanced nutrition, and, when needed, medical treatments like hormone therapy or anti-inflammatory medication. Combining movement, an anti-inflammatory diet, and proper hydration can help reduce discomfort and improve mobility.
This guide explains how to treat menopause joint pain. We will look at why menopause can trigger joint pain, its common symptoms, risk factors and effective relief options from supplements and natural remedies to medical care. You’ll also learn when it’s time to consult a doctor for lasting joint health.
The Connection: Why Menopause Causes Joint Pain
During menopause, many women experience new or worsening joint discomfort. This is not just a normal part of aging — hormonal changes play a major role in how the joints feel and function.
1. Declining Estrogen Levels
Estrogen helps reduce inflammation, maintain cartilage, and keep joints lubricated. When levels drop during menopause, the protective effect weakens, making joints more prone to stiffness, swelling, and pain.
2. Loss of Muscle Mass and Bone Density
Aging and hormonal changes can lead to sarcopenia (muscle loss) and osteoporosis, which reduce joint support and increase the risk of wear-and-tear injuries. This can make everyday movements more taxing on the joints.
3. Increased Inflammation and Weight Gain
Lower estrogen levels can trigger a rise in inflammatory chemicals in the body. Combined with weight gain common in menopause, this puts extra pressure on weight-bearing joints like the knees and hips.
Understanding these connections can help women take proactive steps — from targeted exercise to hormone management — to protect joint health and ease discomfort during menopause.
Treatment Approaches for Menopause Joint Pain
Managing menopause joint pain often requires a multi-faceted approach that combines lifestyle adjustments, nutritional support, natural therapies, and, when needed, medical care. The aim is to reduce inflammation, strengthen the body’s support structures, and prevent long-term joint damage.
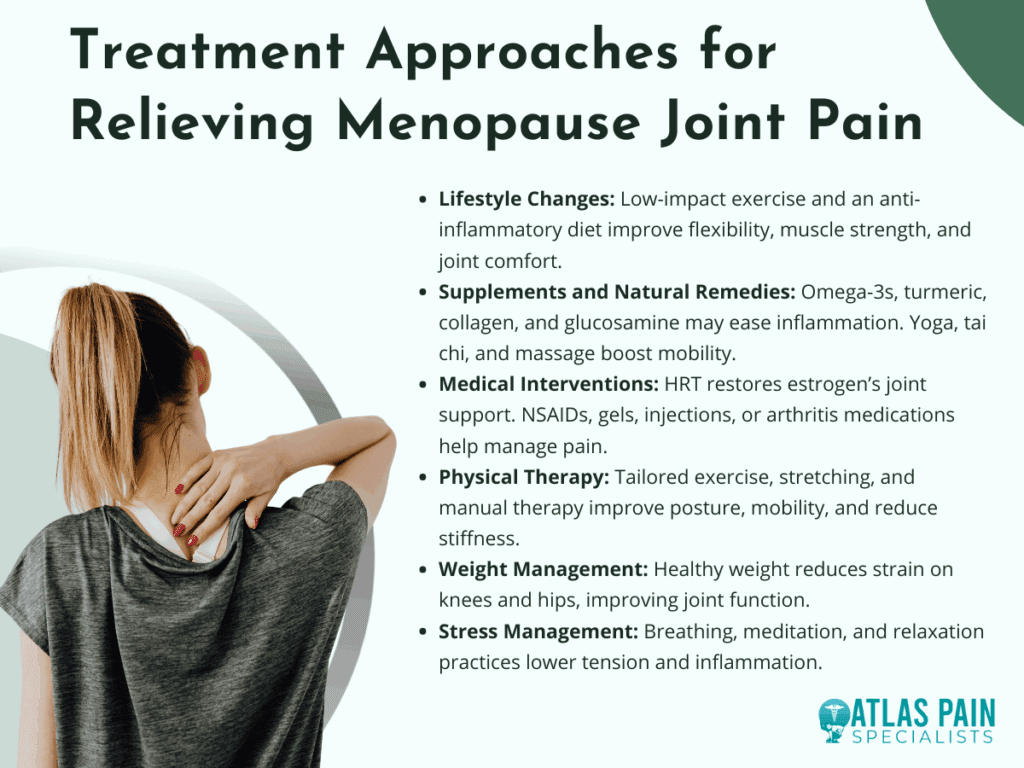
1. Lifestyle Changes
Regular low-impact exercises such as swimming, walking, Pilates, or cycling help maintain flexibility and strengthen the muscles that protect joints. Coupling physical activity with an anti-inflammatory diet rich in vegetables, omega-3s, and lean proteins can improve mobility and reduce discomfort.
2. Supplements and Natural Remedies
Omega-3 fatty acids, turmeric, collagen peptides, and glucosamine may support joint structure and decrease inflammation. Complementary therapies like acupuncture, yoga, tai chi, and massage can improve circulation, flexibility, and overall comfort.
3. Medical Interventions
Hormone Replacement Therapy (HRT) may help restore estrogen’s anti-inflammatory benefits and protect cartilage health. For pain management, doctors may recommend NSAIDs, topical anti-inflammatory gels, corticosteroid injections, or medications for arthritis-related conditions.
4. Physical Therapy and Rehabilitation
A physical therapist can create a tailored exercise plan to strengthen joint-supporting muscles, improve posture, and enhance mobility. Targeted stretching and manual therapy can also help reduce stiffness and pain.
5. Weight Management
Maintaining a healthy weight reduces the load on weight-bearing joints like the knees and hips, easing discomfort. Even modest weight loss can significantly improve mobility and joint function.
6. Stress Management
Chronic stress can increase inflammation and make pain feel more intense. Techniques such as deep breathing, meditation, and progressive muscle relaxation can help reduce tension and support overall joint health.
By combining these strategies, women can take control of menopause-related joint pain, improve daily comfort, and protect their mobility well into the future.
Symptoms to Watch For
Menopause joint pain can develop gradually or appear suddenly, often affecting daily comfort and mobility. Recognizing early warning signs helps in addressing the problem before it becomes more severe.
1. Morning Stiffness
Many women notice their joints feel tight and difficult to move upon waking. This stiffness typically eases with gentle activity but may return after periods of inactivity.
2. Joint Swelling and Tenderness
Reduced estrogen can lead to inflammation, causing joints to appear puffy or feel warm to the touch. Swelling often makes movement uncomfortable and can limit range of motion.
3. Clicking or Grinding Sensations
Loss of cartilage or changes in joint lubrication can cause cracking or popping sounds during movement. While not always painful, these sensations may signal early joint wear.
4. Reduced Flexibility and Range of Motion
Joints may feel less mobile, making activities like climbing stairs or bending more difficult. This stiffness can progress without targeted stretching or exercise.
5. Persistent Aching or Pain
Discomfort may occur during activity or at rest, affecting knees, hips, shoulders, or smaller joints in the hands. Over time, this can interfere with sleep and daily tasks.
Identifying these symptoms early allows for quicker treatment, which can help preserve joint function and prevent long-term damage. Monitoring changes in your body is key to managing menopause-related joint issues effectively.
Risk Factors for Menopause-Related Joint Pain
Certain factors can increase the likelihood of experiencing joint pain during menopause. Understanding these risks can help you take preventive steps and make lifestyle choices that protect joint health.
1. Family History of Arthritis or Osteoporosis
Genetics can play a strong role in joint health, influencing cartilage strength, bone density, and inflammatory responses. If close relatives have these conditions, your risk may be higher during menopause.
2. Sedentary Lifestyle
Lack of regular movement weakens muscles and reduces joint flexibility, making them more vulnerable to stiffness and pain. A sedentary routine can also contribute to weight gain, adding extra strain to joints.
3. Poor Diet Lacking Essential Nutrients
Diets low in calcium, vitamin D, and protein can weaken bones and muscles, reducing the body’s ability to support and protect joints. Nutrient deficiencies may also increase inflammation.
4. Previous Joint Injuries
Old injuries can leave joints more susceptible to wear and tear over time. Menopause-related changes may worsen discomfort or stiffness in these areas.
5. Smoking and Excessive Alcohol Use
Smoking reduces blood flow to joints, slowing healing and increasing inflammation. Excess alcohol intake can also weaken bones and contribute to poor joint health.
Recognizing your risk factors is the first step toward prevention. By addressing lifestyle habits early, you can reduce your chances of experiencing severe menopause joint pain and protect your mobility for years to come.
Natural and Alternative Remedies
Natural and alternative approaches can complement medical treatment for menopause joint pain, helping to reduce inflammation, improve flexibility, and support overall well-being. These options often focus on whole-body balance and gentle, non-invasive care.
1. Acupuncture
This traditional Chinese therapy involves inserting fine needles into specific points to stimulate healing and reduce inflammation. Many women report improved mobility and less joint discomfort after regular sessions.
2. Massage Therapy
Targeted massage can relieve muscle tension around affected joints, improve blood flow, and promote relaxation. Regular sessions may also help reduce stiffness and improve range of motion.
3. Yoga and Tai Chi
These gentle, low-impact practices improve flexibility, strengthen muscles, and promote better posture. They also enhance mindfulness, which can help manage the perception of pain.
4. Herbal Supplements
Turmeric, ginger, and Boswellia are known for their natural anti-inflammatory properties. When taken appropriately, they may reduce swelling and joint discomfort, though consultation with a healthcare provider is advised.
5. Heat and Cold Therapy
Applying heat can relax muscles and improve circulation, while cold packs help reduce swelling and numb sharp pain. Alternating between the two may offer additional relief.
Integrating natural remedies into your routine can provide extra support in managing menopause joint pain, especially when combined with healthy lifestyle habits and medical guidance. Always consult a professional before starting new treatments to ensure they’re safe for your individual needs.
Medical Treatment Options
When lifestyle changes and natural remedies are not enough, medical treatments can help address the root causes of menopause joint pain and provide stronger symptom relief. These approaches are best tailored to each individual’s health needs and risk factors.
1. Hormone Replacement Therapy (HRT)
HRT can help restore estrogen levels, reducing inflammation and supporting joint health. It may also relieve other menopause symptoms, though it’s important to discuss potential risks and benefits with a healthcare provider.
2. Nonsteroidal Anti-Inflammatory Drugs (NSAIDs)
Over-the-counter options like ibuprofen or naproxen can ease pain and reduce swelling. They are useful for flare-ups but should be taken as directed to avoid side effects.
3. Topical Anti-Inflammatory Treatments
Gels or creams containing diclofenac or capsaicin can be applied directly to painful joints. These provide targeted relief with fewer systemic side effects than oral medications.
4. Corticosteroid Injections
For severe pain or inflammation, doctors may recommend steroid injections into the affected joint. These can offer fast relief, though repeated use is generally limited due to potential joint damage.
5. Prescription Medications for Arthritis
If menopause symptoms overlap with arthritis, disease-specific medications may be prescribed. These help manage inflammation and slow joint damage progression.
Medical interventions can be highly effective when used alongside healthy lifestyle habits. Working closely with a healthcare provider ensures you choose the safest and most effective options for your situation.
When to Seek Urgent Medical Care
While most menopause-related joint pain can be managed with lifestyle changes and regular care, certain symptoms may indicate a more serious condition. Prompt medical attention can prevent complications and ensure proper treatment.
- Sudden, Severe Joint Pain - Intense pain that comes on quickly could signal a serious injury, infection, or inflammatory flare-up requiring immediate evaluation.
- Visible Joint Deformity - Any sudden change in joint shape or alignment may indicate dislocation, fracture, or advanced arthritis that needs urgent care.
- Signs of Infection - Redness, warmth, swelling, and fever around a joint can point to a joint infection, which is a medical emergency.
- Unexplained Fever with Joint Pain - This combination can indicate an underlying inflammatory or infectious condition that requires prompt testing and treatment.
- Loss of Mobility or Function - Inability to bear weight or move a joint normally may mean structural damage or severe inflammation that needs immediate attention.
If you notice any of these symptoms, seek medical care right away to prevent long-term damage and address potential underlying health issues.
Bottom Line
Menopause joint pain may be a natural result of hormonal changes, but it doesn’t have to limit your quality of life. With the right mix of lifestyle adjustments, natural remedies, and medical care, it’s possible to reduce discomfort, improve mobility, and protect joint health for the long term.
Listening to your body, addressing symptoms early, and working closely with a healthcare provider are key to effective management. By taking proactive steps, you can stay active, independent, and pain-free well beyond menopause.
Living with anxiety is difficult enough, but when nerve pain joins the picture, the discomfort can feel overwhelming. The sharp, burning, or tingling sensations that travel along nerves are often intensified by stress. Anxiety does not always cause nerve pain directly, but it can heighten sensitivity in the nervous system, making existing discomfort worse and sometimes even triggering new sensations. Learning how to stop anxiety nerve pain involves a mix of calming the mind, protecting the body, and developing habits that support both mental and physical health.
Below we break down the relationship between anxiety and nerve pain, practical strategies for relief, and long-term approaches that bring control back into your hands.
Understanding Anxiety-Related Nerve Pain
When people first experience nerve pain during an anxious period, it can be confusing. Anxiety can cause muscle tightness, disrupted blood flow, and overactive nerve signaling. These physical reactions sometimes create sensations similar to neuropathy, such as pins and needles, burning, or electric-like shocks.
The key idea is that anxiety amplifies the nervous system’s signals, making pain feel more intense than it would under calm conditions. For example, if you are already dealing with a pinched nerve, stress hormones like cortisol may heighten your sensitivity to the discomfort. Even in the absence of an existing injury, anxiety can cause body sensations that mimic nerve pain because of constant muscle tension and misfired nerve communication.
Understanding this connection is important. It shifts the perspective from worrying about mysterious symptoms to realizing that the brain and body are linked. Once you recognize the role anxiety plays, you can begin addressing both the physical discomfort and the mental stress that feeds into it.
Short-Term Relief Techniques
Calming nerve pain in the moment often means giving your body and mind a chance to reset. These are methods that can be used during flare-ups to ease symptoms and prevent spirals of anxiety.
The most effective short-term relief combines relaxation with gentle body awareness. When you slow down your stress response, the nervous system becomes less reactive.
Controlled Breathing
Breathing exercises may seem simple, but they directly influence how the nervous system functions. Slow, deep breaths reduce the “fight or flight” response that fuels nerve pain sensitivity. One method is box breathing: inhale for four counts, hold for four, exhale for four, hold again for four, and repeat several times.
Progressive Muscle Relaxation
Tight muscles put pressure on nerves, which can worsen pain. With progressive muscle relaxation, you tense one muscle group at a time for a few seconds, then release. This helps the body recognize the difference between tension and relaxation, often leading to reduced nerve irritation.
Grounding Exercises
Sometimes nerve pain worsens when attention is focused too intensely on it. Grounding techniques, like naming five things you can see, four you can touch, three you can hear, two you can smell, and one you can taste, bring the brain back to the present moment instead of cycling through anxious sensations.
Gentle Movement
If the pain allows, slow stretches or light walking improve circulation and reduce stiffness. Even a few minutes of shoulder rolls or neck stretches can ease nerve compression and help the body relax.
Lifestyle Adjustments for Long-Term Comfort
Managing anxiety-related nerve pain is not just about handling flare-ups. The way you eat, sleep, move, and handle daily stress determines how often and how severe the pain becomes.
Long-term relief from anxiety nerve pain requires steady lifestyle habits that calm the nervous system and strengthen the body. This does not mean a total life overhaul in a single week. Small, consistent changes build resilience over time.
Sleep and Rest
Poor sleep increases both pain sensitivity and anxiety. Aiming for consistent bedtimes, limiting screen exposure before sleep, and keeping the bedroom cool and quiet can help restore restorative rest. When the brain is rested, the body interprets pain signals less harshly.
Balanced Diet
Inflammation makes nerve pain worse, and stress hormones are also affected by diet. Including foods rich in omega-3 fatty acids, leafy greens, whole grains, and lean proteins helps stabilize mood and reduce inflammation. Avoiding excessive caffeine and sugar prevents spikes in anxiety that can aggravate pain.
Exercise
Physical activity strengthens muscles, improves posture, and reduces chronic tension. Low-impact exercises like swimming, yoga, and cycling are particularly helpful for nerve health. Beyond physical benefits, exercise triggers endorphins, which naturally counter both anxiety and pain.
Stress Management
Incorporating regular stress-reducing practices makes a difference over time. Meditation, journaling, or mindful hobbies like painting or gardening create mental breaks from constant stress. Over weeks and months, this lowers baseline anxiety, which in turn reduces nerve pain sensitivity.
Posture Awareness
Many anxiety sufferers unconsciously hunch their shoulders or clench their jaw. These habits create nerve compression, especially in the neck and back. Paying attention to body alignment during daily tasks can ease strain and prevent pain.
Common Triggers That Worsen Anxiety Nerve Pain
Even when practicing good self-care, certain daily habits or situations can flare up nerve pain. Recognizing these triggers makes it easier to avoid unnecessary discomfort.
Anxiety nerve pain often worsens because of small lifestyle factors that overstimulate the nervous system or strain the body. Becoming aware of them provides another layer of control.
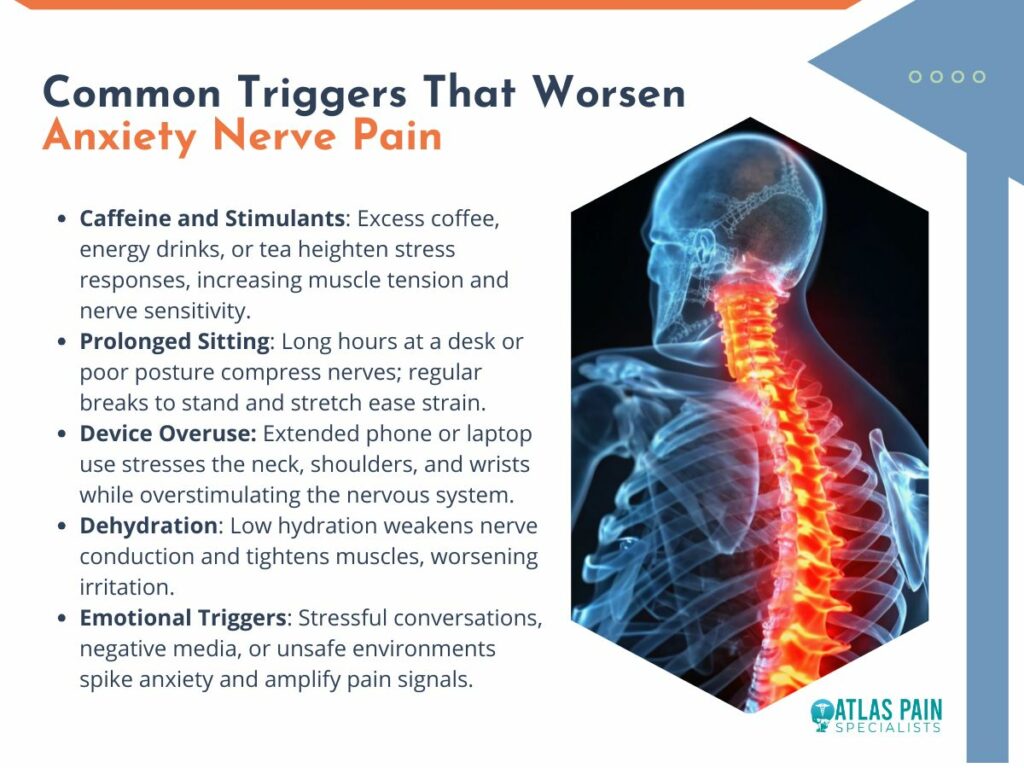
Caffeine and Stimulants
Caffeine may increase alertness, but it also heightens the body’s stress response. Too much coffee, energy drinks, or even strong tea can trigger jitters, muscle tension, and nerve sensitivity.
Prolonged Sitting
Sitting for long periods, especially at desks or with poor posture, compresses nerves in the spine and legs. Breaks to stand, stretch, or walk every hour can reduce flare-ups.
Device Overuse
Constant phone scrolling or laptop use without breaks strains the neck, shoulders, and wrists. This creates nerve compression while also feeding anxiety with overstimulation.
Dehydration
When the body lacks hydration, nerve conduction is less efficient, and muscles become tighter, which may worsen nerve irritation. Drinking water regularly throughout the day supports smoother nerve function.
Emotional Triggers
Stressful conversations, news consumption, or environments that feel unsafe can all spike anxiety, which in turn heightens pain signals. Creating healthy boundaries with media and people helps reduce this effect.
Comparison: Short-Term vs. Long-Term Strategies
| Approach | Short-Term Relief | Long-Term Comfort |
| Breathing & Relaxation | Calms immediate stress response and reduces sensitivity to pain | Builds a resilient nervous system when practiced daily |
| Gentle Movement | Provides instant circulation and reduces stiffness | Strengthens muscles, prevents chronic tension, improves nerve health |
| Grounding & Distraction | Breaks focus on pain during flare-ups | Creates healthier thought patterns and reduces anxiety over time |
| Diet & Hydration | Stabilizes blood sugar and reduces inflammation temporarily | Supports steady energy, balanced mood, and long-term nerve protection |
| Sleep & Rest | A single nap can reduce pain intensity temporarily | Consistent sleep restores the nervous system and prevents recurrent pain flare-ups |
| Professional Support | Offers immediate guidance or treatment when needed | Provides lasting solutions through therapy, medical care, and physical rehabilitation |
Short-term strategies interrupt the cycle in the moment, while long-term practices gradually reduce how often anxiety nerve pain occurs. Both are valuable, and using them together brings the best results.
When to Seek Professional Help
Self-care goes a long way, but sometimes nerve pain and anxiety persist despite best efforts. At that point, it is important to involve medical and mental health professionals.
Persistent nerve pain alongside anxiety should be evaluated to rule out underlying conditions and to provide targeted treatment. Even if the main cause is anxiety, professional support brings relief faster and prevents complications.
Medical Evaluation
Doctors may check for underlying neuropathy, vitamin deficiencies, or musculoskeletal issues. If these are found, addressing them directly often improves both pain and anxiety. Sometimes, simple corrections such as vitamin B12 supplementation or ergonomic adjustments at work can ease discomfort.
Therapy
Cognitive Behavioral Therapy (CBT) is one of the most effective treatments for anxiety, and it also helps people reinterpret and manage physical sensations like nerve pain. By reframing anxious thoughts and practicing coping strategies, therapy reduces the severity of symptoms.
Medication Options
In some cases, medication may be prescribed to calm nerve signaling or to manage anxiety. These range from antidepressants that stabilize mood and nerve sensitivity to medications that specifically target nerve pain. Decisions about medication should always be made in consultation with a healthcare provider.
Physical Therapy
Targeted exercises, nerve gliding techniques, and manual therapy from a trained physical therapist can reduce compression and improve nerve function. This also restores confidence in the body, reducing fear that worsens anxiety.
Building a Daily Self-Care Routine
The best results often come from combining several small practices into a structured routine. Creating consistency reassures the brain and body that they are safe, reducing both anxiety and nerve flare-ups.
A daily self-care routine that balances mind and body is the strongest defense against anxiety nerve pain.
Morning
- Begin the day with gentle stretches such as neck tilts, shoulder rolls, or cat-cow stretches to ease overnight tension.
- Practice five minutes of deep breathing or meditation before checking devices.
- Eat a protein-rich breakfast with eggs, oatmeal, or yogurt to stabilize blood sugar.
Midday
- Take short breaks from work every 60 minutes. Stand, walk, or stretch arms overhead.
- Choose a balanced lunch with lean protein, vegetables, and whole grains to prevent energy crashes.
- Use grounding techniques during stressful moments, especially after meetings or heavy workloads.
Evening
- Engage in 20–30 minutes of light exercise like walking, cycling, or swimming to release built-up tension.
- Limit screen exposure an hour before bedtime, and instead read or listen to calming music.
- Create a consistent wind-down routine with dimmed lights, a warm shower, or herbal tea to signal the body it is time for rest.
By layering these practices, the nervous system adapts to a calmer state, making flare-ups less frequent and easier to manage.
Conclusion
Learning how to stop anxiety nerve pain is about more than chasing away symptoms. It is about understanding the two-way connection between body and mind, then using that knowledge to build healthier patterns. Quick relief techniques help break the cycle during flare-ups, while lifestyle adjustments and professional support provide long-term stability. Over time, the combination of calm breathing, balanced routines, and mindful care gives back control. While nerve pain can feel alarming in the moment, it becomes far less powerful when met with consistent strategies that strengthen both mental and physical resilience.